Wednesday, November 25, 2009

November 20, 2009 - Oh the sights you can see on Peachtree

1/500f2.8ISO 400110mmRAW

Just a quick post. I got today's photo on the way home, at the corner of Peachtree and Lenox Roads. This was taken during rush hour, in one of the busiest intersections of Buckhead.

This nut (because I don't know what else to call him), was standing on the median of Peachtree Road by Phipps Plaza. He was raising his cross, pumping his fists, and dancing whenever people acknowledged him in some way — even if it was a negative kind of acknowledgment.

We had stopped at the red light when I saw him. I had to hurry and put my camera together before the light changed, and I snapped this shot as we turned through the intersection and past him. It was a total snapshot!

Tuesday, November 24, 2009

November 19, 2009 - Armageddon cometh?

1/2000f5.6ISO 400200mmRAW

I was lucky to get this, and it didn't even turn out the way I expected. Coming home from work with my carpool, we had left Buckhead under party sunny skies. But by the time we got halfway home a thick layer of foggy, misty clouds had settled over us.

The setting sun gave us a rare moment when the sun was just off of the horizon and visible under the layer of clouds. I quickly pulled out my camera and attached my 70-200mm lens to get a few quick snapshots as we were going over the interstate. Most of my shots were jostled by the moving car (no, I wasn't driving) or blocked by the accompanying flow of cars. But this one shot was clear.

I used my long lens to put an emphasis the interaction between the sun and the edge of the clouds. I had to guess at an ISO because of the (extremely) short amount of time I had. But it worked, and for that I am glad. I wish I had a higher vantage point so I could have caught the long line of cars backed up on the highway, but the car was too low and the overpass' railing was in the way.

Friday, November 20, 2009

November 18, 2009 - Is the tree on fire?

1/60f2.8ISO 40073mmRAW

Just a real quick post today for a photo that didn't take long. There is a beautiful flame-orange tree in the park down the street and I had been dying to take a photo of it. But there was a slight problem — it is sandwiched between the four-lane street and the parking lot for the park, so I wasn't sure how to photograph it without including something distracting in the backgroud.

Obviously, I finally figured it out.

I took out my 70-200mm lens and positioned myself along the fence about 80 feet from the tree. Using the focal length to my advantage, I was able to frame the tree and the fence in such a way as to leave out the parking lot (which was immediately outside the frame on the right). It also required some timing to leave out all the cars driving past on the left. It took several attempts, but I finally got a good, clear shot.

I didn't have a tripod or monopod for this shot, so I had to brace the camera as much as possible to avoid camera shake at this low shutter speed. Since I was shooting around 70mm, that meant my shutter speed needed to be at least 1/70 of a second. As you can see, I wasn't there. So some of the shots came out a little blurry from me not holding the camera still enough. This is another instance of where taking a lot of shots (by holding the shutter button down) helped produce a clear, shake free image.

To brace the camera, I knelt down on my right knee and rested my left elbow on the top of my left thigh while keeping my right arm close to the body. Because I was holding the heavy lens in my left hand, the left leg provided lots of support.

As for things I wish I could change, I wish the day had been sunny and not overcast. That would have let the blue sky shine through the leaves instead of the bright white overcast sky. I also wish there wasn't so many leaves on the ground because the nice thick green grass made a good contrast in color with the leaves in the tree.

And in case you are wondering, these leaves are really that color. I did very little manipulation in Photoshop Elements to accentuate the color. Very little.

Wednesday, November 18, 2009

November 17, 2009 - Black and white rose

1/50f9ISO 160050mmRAW

I am very pleased with how this shot came out. Rachel had bought some flowers for herself, and I took this while they were in a vase on the table. I took the photo using only the light from the table lamp, which I feel gives it good depth and a three-dimensional look.

I shot at ISO 1600 to both give a grainy look and provide enough shutter speed so I could stop the lens down to f9, which provided a good depth of field. In Photoshop Elements, I converted the pink roses to black and white by removing all saturation and increasing the clarity and contrast.

Tuesday, November 17, 2009

November 16, 2009 - A beautiful Fall yard

1/320f5.6ISO 20018mmRAW

I have always admired how beautiful this yard is in the Fall and now I have a great photo to prove it.

I shot this late in the afternoon, about an hour and a half before the sun sets. The angle of the sun gives a great blue sky without a polarizer. The sunlight coming from the right does a great job of striking the brilliant leaves, but it doesn't over-expose the rest of the yard. This allows the house in the shadows of the great pines to still be visible.

I think without the house the photo wouldn't be nearly as good. It clearly shows that this is someone's home, their yard that they have spent countless hours sweating over. And their toils are well worth it.

I shot this RAW, but the sunlight white balance setting in the camera did a great job of getting the colors right and I didn't need to correct them much. I did some selective saturation in Photoshop Elements, but otherwise left the photo alone.

I wasn't sure how the homeowners would react to me taking the photo (even though I was standing on a public sidewalk while shooting), so I preset the camera to what I thought would be a good starting point before walking over. I snapped two photos, checking each on the camera's display, figured I had a good shot, and got the heck out of dodge.

Monday, November 16, 2009

November 15, 2009 - the Earth's Shadow

1/60f5.6ISO 40027mmRAW

To be honest, this wasn't the photo I wanted to take today. True, I planned on taking a photo of my church while standing from this exact location — just not at sunset.

I had seen this shot earlier in the day when I was leaving the church after the service was done. It was with a deep, clear blue sky behind the building with all of the Autumn leaves brightly illuminated by the mid-day sun. In fact, the sun was at an angle where the sky would have had good, deep blue even without a polarized lens.

That's the photo I wanted to take.

But sadly, I wasn't able to get back to the church until the sun was going down. So instead, I settled for a sunset shot with the effect called the "Earth's Shadow" coloring the sky behind the building. What causes this shadow? The Earth itself. The sun has gone done below the western horizon behind me, which causes a shadow to appear just above the horizon in the eastern sky. A lot of people don't notice this because the eye is drawn to the brighter part of the sky (which is the setting sun in the west). But it can be a dramatic effect.

I shot this with my 18-55mm zoom at ISO 400 and f5.6. This was the best combination to still get a fast enough shutter speed (1/60) to avoid any camera shake (blurriness) yet still have enough aperture to make sure everything was in focus. The film speed was slow enough to create a clean image and avoid the graininess that can come at higher speeds. I do wish, however, that I had a vantage point that would have been a few feet higher.

I did quite a bit of experimenting in Photoshop Elements (using my new favorite tool, Adjust Color Curves) to get the color to the point that I remembered it. But I am worried I overdid the effect. What do you think? Does this look unnatural? Or does it look like a photo taken just as the sun is setting?

Sunday, November 15, 2009

November 14, 2009 - Turning over a new leaf

1/5000f4ISO 100200mmRAW

Alright, I confess. I have given up on trying to get caught up on my photos. Not only that, but I'll also admit I have missed a few days in the past three weeks (working too hard can do that to you — start missing things that are important to you).

So today I am turning over a new leaf (snicker), and promise to do better.

With today's photo I tried to capture some of the beauty that can be seen when you let the sunlight shine through some of your subjects. Thanks to a little Curves adjustment in Photoshop Elements, I was really able to bring out the vivid color in both the sky and the leaves in this shot.

I really like how I zoomed in with a long telephoto lens to isolate this small clump of leaves and almost remove everything else from the shot. I also used a shallow aperture to make the other leaves on the right out of focus.

This is what can happen when you take your camera out and play around with shots. Sometimes the best ones are those you don't plan. But once they happen, remembering them will make you a better photographer.

Monday, November 2, 2009

New Photos

I had some free time tonight, so I posted five of my photos. They are all available on the main page for your viewing pleasure! Just scroll past the Halloween photo to find them.

Sunday, November 1, 2009

October 30, 2009 - Happy haunting!

1/30f2.0ISO 320050mmRAW

I know I am still behind in posting, but I got such a great photo last night I couldn't wait to share it. Hopefully, this will help motivate me to get fully caught up.

Tonight I got a great photo of one of the youth at our church's Halloween Trunk or Treat party. He had his face painted as if it was stitched up, and had fun walking around, staring and pointing at people in a quiet, yet menacing way.

I wanted to get a photo that I thought would portray his behavior in a more sinister way. Here's how I did it.

I set him up in a dark hallway beside an open door where the light was spilling from the room into the dark hallway. This illuminated him from the side, but it still left the hallway dark. The light coming from behind him is about 100 feet away. This light is reflecting on some of the woodwork and art along the walls.

I shot this with my 50mm f1.8 lens with the camera set in aperture priority mode. I set the aperture to f2.0 to get a fast enough shutter speed (at 3200 ISO) to get the photo sharp and clear without using a flash (which would have totally destroyed the lighting effect).

Finally, I edited the photo to be a little soft (in other words, I didn't do any sharpening) and off-color on purpose. I thought it made it look like more like a dream (or nightmare) type state.

There are two things that really bug me about the shot. First, there is a chair in the hallway, which you can see in the lower left of the photo. I wish I had noticed it and moved it first. Second, he hand is much blurrier than I thought it would be. I wish it had gotten into focus a little more.

But what's done is done. What do you guys think? How would you rate the photo?

Saturday, October 31, 2009

October 24, 2009 - the best Photoshop Elements book

1/60f2.8ISO 80050mmRAW

After my success with using Curves in Photoshop Elements, I am totally convinced this is the best book for digital photographers to use for Photoshop Elements. If you don't have version 6, just look the edition that matches your version. Scott Kelby and Matt Kloskowski do a great job of having an edition out immediately after Adobe releases a new version.

To take this photo, I placed the book on my kitchen table (which has a nice black surface). I stood on a chair to get over the book so I would have more a a head-on view. I used my 50mm f1.8 lens and pumped up the ISO to 800 so I could shoot with natural lighting in the room and not rely on a flash. Finally, in postproduction, I adjusted the color to make everything appear natural.

The only thing I wish I had done differently is pay more attention to the corners. I had clipped the lower right corner of the book while taking the picture. To compensate a little for that, I also clipped the upper left corner when I cropped the photo down to fit on my blog.

And I really do love this book. Can you tell by the roughed up edges to the cover?

Friday, October 30, 2009

October 22, 2009 - Intense sunrise photo


1/100f5.6ISO 80018mmRAW

Thank goodness for being prepared. I have been bringing my camera bag to work everyday since I started this 365 project. This morning it really paid off. This sunrise was happening when I got to my desk.

This photo is actually a photo-merge of two different versions of the same shot. I got the technique from the Photoshop Elements book I told you about back on October 7. I first processed the photo to give great sunset colors and saved it. I then reopened the original, proccessed it foe sunset, and merged the two.


1/125f5.6ISO 80032mmRAW

And this photo is what I saw when I turned around. This is a great example of turning around and looking at things differently. You may be missing a great photo just because it isn't what you originally envisioned.

I wasn't sure what photo I liked more, so I put them both in. What do you think?

October 21, 2009 - Black and white ivy

1/160f5ISO 400175mmRAW

Today's photo is a closeup of some simple ivy against its concrete border. I used my 70-200mm f2.8 lens to isolate just the ivy in the photo and create a nice depth-of-field.

In Photoshop Elements, I increased the contrast and added to the shadows. I also burned in (darkened) the edges to bring more attention to the leaves in the center.

I like this photo a lot. What do you think?

October 20, 2009 - Operation cow drop

1/125f5ISO 40018mmRAW

The Chick-fil-A down the street had a lunchtime festival today. Games, food, and a cow drop. That's right, a cow drop. They dropped 300 mini plush cows — with parachutes — down to crowd of at least 600 people. It was crazy, as the photo shows.

This was a tricky shot. We were outside, but underneath a large, covered plaza between two tall buildings. Both ends of the plaza were very bright, which was fooling the camera a little bit. I put the flash on to make sure that whichever way I was facing the shot would be illuminated. Finally, I took a bunch of shots to try to get something good. And out of about 50 shots, I came up with this winner.

I really like it because it shows a lot of action. There are all the hands reaching for the cow, and the lady in the center isolated fantastically against the clump of people. You can clearly see her business attire — the high heels, short skirt, and white blouse — reaching for a cheap little cow like all the rest (oh, did I mention they all had food coupons attached to them?).

I wish, however, I could have been closer and had more of the faces towards the camera.

October 18, 2009 - A nice warm fire

1/60f5.6ISO 40021mmRAW

The weather is getting colder, so we put some logs in the fireplace today. After the girls got dressed for church, they sat in front of the fire to play.

I bounced the flash off of the ceiling to light up this photo. I took a bunch of photos to get a really good expression from one of the kids, and it worked. I also got down to their level instead of simply taking the photo while standing up. If you aren't doing this yet with your photos, do it — it is a subtle but significant change that will make your photos much better.

October 16, 2009 - Curving tables

1/1000f8.0ISO 160024mmRAW

Today was overcast, so I went about looking for good subjects for black and white photos. This is a set of tables outside a Chick-fil-A. I liked the symmetry of the composition, and I cropped out everything that was detracting from the tables.

I shot the photo at ISO 1600 to add a bit of graininess, and set the aperture to f8 to get all of the tables in focus. In Photoshop Elements, I increased the contrast and filled in the shadows a bit in an effort to mimic old-fashioned black and white film.

In retrospect, I think the photo is kinda plain. Not much to it. What do you think? I am trying to do more black and white photography, so I am going to keep plugging away and see what I can do.

Wednesday, October 28, 2009

October 15, 2009 - Behind the scenes at a HowStuffWorks podcast

1/60f506ISO 40032mmRAW

I lucked out today. For the past several weeks, ever since I made this photo for Chuck and Josh of Stuff You Should Know fame, I have been wanting to get a photo of one of the podcast teams at HowStuffWorks doing their podcast. Well, today it happened.

I happened to pass the recording studio when they were just setting up for a recording of Stuff You Missed inn History Class. I politely asked permission to get some shots, and they agreed as long as it was during their sound check before they started recording. So a hearty thanks to Sarah and Katie for their cooperation, along with Jeri and Elizabeth who are part of the production crew.

For the photo, I got down to the same level as Sarah and Katie and bounced the dedicated flash off of the ceiling. I put the camera into manual mode, dialing in f5.6, 1/60, and ISO 400 for aperture, shutter, and film speed, respectively. I focused about a third into the scene (the microphone by Katie on the right), which helped produce a nice sharp photo from front to back.

I took a bunch of shots and selected this as the best. I felt it showed how much fun these two ladies have when talking about their subjects. Sarah definitely seems to be chucking about what Katie is saying. And if you listen to their podcasts, you know that happens a lot.

Taking a lot of shots also helped me with another problem. When taking photos of people talking it is very easy to catch them in unusual (and sometimes goofy) facial expressions. When you look at someone talk, you don't really notice how many positions the mouth and lips take to form sounds and words. But a photo freezes that motion. So take a lot of shots when you are shooting someone talking. It will give you more of a chance to get a good looking shot that still conveys the idea of talking.

I wish I could have gotten a better angle, however, one that would have shown more of Katie's face. But there was some equipment in the way. Plus, I wanted to isolate the photo on the table where they do their work and leave out the other stuff that is used for the video podcasts. Some of that video equipment is literally a foot behind Katie, but because of how I shot and cropped this picture you wouldn't have any idea if I hadn't told you. This is another good example of how photography can be as much about what you leave out of the shot as what you keep in.

Tuesday, October 27, 2009

October 13, 2009 - Archiving old photos

1/60f2.2ISO 160050mmRAW

This is a rather bland, simple photo. But the underlying significance is huge. This box represents all of my archived photos from before I started using an image management system. It contains nearly all of the photos I have taken since 2002 (sadly, some are missing) and it is sitting beside my desk, open and ready for me to import and catalog them all.

It's a daunting task, but one that I want to get done. I have actually started, but there is a long way to go.

Why would I want to do such a thing? For three reasons. First, those old photos aren't really getting looked at and there are some good ones in there. Second, I sometimes have a past client ask for copies of their photos again. And third, I have a bunch of family and personal shots in there, too. My wife and kids just love looking at their old photos, and it becomes very easy to find particular photos with proper tagging in Photoshop Elements.

That's right, I said Elements. I use Photoshop Elements for managing my photos, and I love it. The Organizer part of the program is fantastic. You can tag photos, add captions, attach keywords, and search everything based on those items. Best yet, you can limit your searches to specific time frames to help narrow your results.

As for my current photos, everything goes into Elements (the current count is nearly 25,000). I have a specific regimen for importing photos and I don't deviate from it. Every photo that goes into Elements gets tagged on import so I can find it later.

I know that Elements isn't as nice as some of the other products out there (like Lightroom), but it was also only $90. And I went through a two or three month period of trying out a bunch of products. I didn't want Elements to win initially (I can be pretty anti-establishment sometimes, and believe me — Adobe is definitely the establishment when it comes to imaging software). But I realized I kept comparing everything I tried to what Elements could do. So I went out and bought Elements.

What kind of organizing do you do? Anyone want to share?

October 12, 2009 - A lack of diversity

1/15f5.0ISO 160032mmRAW

I am the Scoutmaster of our church's Boy Scout troop and we went to the Bremen Jewish Heritage and Holocaust Museum today for an eye-opening look at what can happen when a large portion of society decides to be intolerant of people who are different than themselves.

The lighting was pretty bad for photography, with some displays having plenty of light for photos while others were darker. I couldn't use a bounce flash off of the ceiling because the ceiling was high, open, and painted a dark color. And I usually don't like using a direct flash, so I set the camera to f3.5 in aperture priority mode (the big 'A' on the dial) and set the ISO to 1600 and tried to get photos using the natural lighting. By setting it to the widest aperture my lens (the Canon 18-55mm f3.5-5.6 IS) can cover, it insures the widest possible aperture is used throughout the zoom range.

As you can tell from the photo's settings, sometimes my shutter speed was really slow, even for using a image-stabilized lens. I tried to keep the camera steady by holding the camera with both hands and keeping my elbows close to my sides. In areas where I knew there was less light, I usually held the shutter button down and relied on my camera's high frame rate to take multiple shots in succession.

The photo above is from one of those multiple shots. I took three in a row, and the middle one was the best. The first and last had motion blur since my son, Joshua, was swaying slightly as he was looking at the display. This one does have a hint of blur in his face, but you can still see him clearly.

In addition to the light being low, my photos also had a lot of different colors caused by multiple types of light bulbs being used by the museum. It resulted in a photo that looked bad (bad enough so that a viewer might first notice the color instead of the subject). The solution was easy: convert it to black and white. Now that distraction is completely gone, leaving you to think about my 13-year-old son learning about the atrocities the Nazi party — and that's what this photo is all about.

I wish I had gotten a good photo that included more of the troop, but all of those had at least one person moving (and therefore blurry). Remember, IS only helps avoid camera shake by essentially keeping the camera still. Anything under 1/60 of a second will still likely cause motion blur. So in hindsight, I should have set the ISO to 3200 and just lived with the extra graininess that comes with it.

By the way, the Bremen is fantastic. It present a powerful collection of photos and information that cover the Holocaust from just before the rise of the Nazi party to the migration of thousands of Jews to Israel after the war. Plan on being there for at least two hours to soak in all of the information. We were there for an hour and a half and it wasn't enough.

It isn't a place for little kids, however. It doesn't do much to hide the atrocities of the Holocaust. And I am glad it doesn't. It helped my son and I have a candid discussion about the war and the Holocaust.


Monday, October 26, 2009

October 11, 2009 - Sunday morning coloring

1/60f5.6ISO 40040mmRAW

I really like today's photo. There may not be much technically masterful about it, but it shows two of my daughters doing one of their favorite things — coloring with their extensive set of tinted, sparkly glue. It's almost as fun as finger paints, but the colors are shimmery and fantastic.

And best of all, Emma and Morgan can really create some dazzling artwork . . . well, at least in my eyes they do.

Once again, I put the camera into manual mode and used my favorite settings for photos with a flash. I find this setting really helps the camera by taking out a bunch of guess work for it to do. Instead, it's like you're telling the camera, "Okay, here's the shutter speed and aperture. All you need to do is figure out the right amount of pop to put into that flash." And by reducing the options, the camera excels.

As for the flash, I used my dedicated Sigma EF-500 DG Super flash and pointed it up at the ceiling. I also zoomed in with the lens some to help isolate the girls and their fun from some of the distracting background in the kitchen.

In hindsight, I wish I had gotten some pictures a few minutes later when their art on the pages in front of them would be more complete. This would really help bring out the idea that they were coloring.

What do you think? What would have been better?

October 10, 2009 - Youth temple trip

Today I accompanied about half our church's youth group to Columbia, South Carolina, for a church activity. It was an all-day trip and I enjoyed being there very much.

When we were done, we gathered outside for a group shot. My camera bag was left home accidentally ("You asked me to pack it? Honest, Dad, I thought you said you were going to put it in the van!"), but one of the kids brought his Nikon D70. It was a little unfamiliar to me (remember, I shoot Canon), but I think I pulled off a decent photo.

I put the group in the shade of some trees to keep the sunlight off of them, but then turned on the camera's built in flash to make them brighter. Otherwise, the bright white building in the background would have over-powered the exposure, leaving them in the dark. I also dropped my shooting level down a little bit to make it easier for me to include the whole spire and statue in the shot.

I focused on the kids (which I think caused the Nikon to set the exposure mainly based on them) and then recomposed the shot to where they were in one corner and the angel atop the spire was in the other. I also helped them stand as a group, staggering each one so all of their faces were easy to see.

I definitely wish I had paid more attention to if I was keeping the camera level. It seems obvious to me that the shot is a little crooked. And there are two or three kids that are in less-than-ideal poses, which drives me crazy. I try to notice these kind of things when I shoot, but I don't always remember.

I apologize for not having any of the settings for the shot, but I was given a copy of the photo and it had lost all of its Exif data.

October 9, 2009 - Another missed day

1/80f5.6ISO 20037mmRAW

Yep, I have missed another day. So in keeping with my tradition of posting a photo of myself on days that I miss, here is a shot taken by my son, Joshua, during our family's egg hunt last Easter.

Yes, I followed my little girls around with a cannon of a Canon. Besides, they're used to it!

October 8, 2009 - Football practice under stormy skies

1/60f5.0ISO 40018mmRAW

I am not too thrilled about today's photo, but here it is. I was short on time and didn't know what to do, but as I was driving home from work (after staying late again) I saw the lights on at the local park. So I stopped for about 10 minutes to see if I could get a shot of a game.

I was disappointed, however, to find out there wasn't a game — just a practice. And it hadn't even started yet. I waited for as long as I felt I could, and grabbed a few snapshots as they moved out to the field for warmups. I purposefully put the ground along the bottom of the frame to bring in the overcast, stormy looking sky.

I wish I had been able to get closer to the players. Maybe catch them in some kind of pre-practice huddle, or lined up on the grass as they stretch. But I had two things going against me. First, I didn't have any time. And second, only the players and the coaches were allowed onto the field. Everyone (and I mean everyone) was to stay on the other side of the gates. The coach seemed like a no nonsense kind of guy, and I wasn't going to push him.

Sunday, October 25, 2009

October 7, 2009 - Gorgeous sunset photo

2 secf11ISO 10018mmRAW

We just had a strong front go pushing through today and it turned into a beautiful, clear day. From past experience, I knew this would produce some strong colors at sunset, so I planned out this shot in advance.

My son and I hiked through a field with waist high grass in order to get on the other side of this massive, old oak tree. We set the camera up on a tripod to insure stability, and took a bunch of photos.

Each shot was done on 'M' so we could alter each shot slightly from the previous one. We mostly experimented in longer or shorter shutter speeds, but we also changed angles and orientations.

Sunset photos are the best when you include something in the sunset. It doesn't matter much what it is (like a silhouetted tree, your best friend, or reflections off of a surface), but its inclusion is vital.

For this shot, I put the silhouetted oak down in the lower corner to also use the rule of thirds. As for the other settings, I wanted a good, deep depth of field, so I went with f11. ISO 100 insured the photo would be smooth and grain-free, and the tripod prevented any blurriness on such a long exposure.

I liked this one the best. There was still enough light so the field wasn't thrown into complete darkness, and the clouds had a little hint of pink in them at the top of the frame. But when I loaded it up into Photoshop Elements, however, I couldn't quite get the color that I wanted. Either the sky wasn't blue enough at the top, the clouds weren't bright enough, or the horizon wasn't yellow enough. And I totally couldn't see any pink in the clouds.

So what did I do? I pulled out The Photoshop Elements 6 Book for Digital Photograhers (here's a link to the same book for the latest version of Photoshop Elements). I reviewed the book for ideas on getting the missing colors, and found the solution &mdash the 'Adjust Color Curves' tool. It's amazing! I'm going to need to use this one more. Not only did it bring out all of the color that was missing, but it also helped me keep the field from going completely black. It completely saved me from going into depression (because I was so frustrated with the lackluster look of the photo).

What do you guys think? Did I go to far? Is the color unreal? Or did I get it right?

Tuesday, October 20, 2009

October 6, 2009 - Beauty amidst the rain

1/200f8ISO 40055mmRAW

I know it's been a while since my last post, but I hope this one is a treat!

Today I went out during lunch after a light rain to try to get some water droplet photos, and this time I think I found a real keeper. These were odd little flowers (all of the blooms are half-circles), but were beautiful and vibrant.

I shot them hand-held with my 18-55mm IS lens, which makes for a decent macro lens in a pinch (or on a tight budget, like me). The sky was still overcast, but there was plenty of light to get a good shutter speed and small-ish aperture (to increase depth of field), all while using a good ISO to avoid graininess.

Having shot in RAW, I loaded it into Photoshop Elements and used Adobe Camera Raw to do some post-processing. I actually lowered the exposure by a quarter and bumped up the vibrance to saturate the colors a little more.

Then I did something I usually don't do — instead of raising the clarity to help sharpen the image, I lowered it to make it appear softer. Then I sharpened just the water droplets in the focus zone to make them really pop out. By being selective with the sharpening, I kept the blurry areas nice and smooth (the sharpening affect would have made these more grainy). For the final touch, I put a vignette around the frame, darkening the edges slightly to bring more attention to the brighter center of the photo.

I like this photo a lot. How do you think I did? If there was one thing I wish I had done a little differently, it would have been to capture the photo at a little bit of an angle instead of being so 'straight down' on the flowers.

Thursday, October 15, 2009

October 5, 2009 - Gloomy day

1/200f8ISO 20032mmRAW

The weather was pretty gloomy today. I took this around lunchtime from the patio on the 15th floor of our office building.

I apologize, but I have been busy the last week or so. I have been overworked and haven't been getting enough sleep.

Tuesday, October 13, 2009

October 4, 2009 - Cinnamon baked goodness

1/4f8ISO 20055mmRAW

I feel like I really learned something from today's photo. Once again, I found myself baking (some cinnamon rolls this time) and took some photos as the batch was cooling. Unlike most of my other photos, however, this was shot from a tripod instead of hand-holding and praying for the best.

I tried two different lenses &mdash first I went with my 18-55mm f3.5-5.6 IS lens, and then I tried my 70-200mm f2.8L lens. After looking through the shots, I really liked the perspective and angle of view of the first lens.

Going into the shot, I thought I would like the photos better from the other lens. Why? Because it is optically sharper. But in reality the smaller, cheaper lens was easier to work with and I got a better angle of view on the rolls.

The tripod let me pick a nice, slow ISO that would give a good, clean image that's free from digital noise (graininess). If you will notice, the shutter speed was 1/4 of a second. Without the tripod, this would have been an impossible shot to make. But even with the tripod there was a problem. This particular shutter speed is smack dab in the middle of a short range of shutter speeds that is susceptible to blurring because of the force of the internal mechanisms of the camera shaking the camera during the shot.

This shake affected the 70-200mm, but not the 18-55mm. I think the difference is the image stabilization. Without it, the 70-200mm had problems. But with it, the 18-55mm performed like a champ.

What would I do differently? I think I would have tried to move the rolls somewhere else, or at least do something to avoid the tile backsplash of the stovetop. The tiles have a floral arrangment printd on it, which can be a little bit of a distraction. Now that I have finished the post, I also think the image is a little tilted. I should have made sure it was level (either when I snapped the photo or with Photoshop Elements in post-processing.

And one other thing &mdash I wish I had made two batches of rolls instead of just one!

Monday, October 12, 2009

October 3, 2009 - What are you willing to give up?

1/30f4ISO 80032mmRAW

I am so proud of my daughter. Leigh Ann had decided that her beautiful long hair was getting too long and she wanted to get it trimmed to shoulder length. But then my wife asked why stop there? She was only a couple of inches shy of the minimum length required for donations to Locks of Love.

So she agreed. She even went above and beyond and cut off nearly a full foot of hair so she could have the haircut you see in the photo.

I took this using the available light from the same window I use for many of my black and white portraits. Thanks to the image-stabilized lens I used, there wasn't any camera shake in the shot despite the slow 1/30th of a second shutter speed. I also removed a painting from above the couch so there wouldn't be any distractions — just a nice blank wall. This let the viewer's concentration be solely upon Leigh Ann and her hair.

About the only thing I wish I had done differently is to lower my angle of view just a little more to completely get rid of the couch. And it would have also been nice to get Leigh Ann to part her lips a little on her smile. When she shows just a little bit of teeth, her smile really shines.

And as you can tell, she just loves her new hairstyle. Not only that, but she is ecstatic that the hair she cut off is not going to waste!

Sunday, October 11, 2009

October 2, 2009 - Water leak

1/125f8ISO 20024mmRAW

As a homeowner, I have come to realize there are all kinds of things that need attention and/or repairs around your house. Undoubtedly, one of the worst phrases you can hear is, "you've got a water leak."

And that's exactly what I was told yesterday.

Luckily, the leak was fairly simple and just a couple of feet from the city's water meter, so it wasn't too hard to find nor dig up. There was a sleeve put over the PVC pipe where it transitioned from 1-inch to 3/4-inch. The pipe had cracked coming out of the sleeve.

I had never worked with PVC before, but it wasn't too hard. Since I did all the work myself, it cost me only about $15. Much better than the $200 quote I had been given by a plumber!

This was a pretty straightforward shot. The sky was overcast, so there weren't any harsh shadows across the pipes. The f8 aperture setting helped insure everything was in focus, from the bottom to the top. I do wish I could have gotten the leak in the photo too, but it was too small to see from this distance. The standing water around the pipes and in the meter box, however, helps you know how bad the leak wss.

Friday, October 9, 2009

October 1, 2009 - Well planned snapshots

1/40f5.0ISO 80029mmRAW

A little more simple of a shot today. I got this while my kids were browsing around for a book to buy at their school's book fair. But even with something that looks like a snapshot still has some thought and planning behind it.

Take this shot, for instance. I cheated a little by putting the camera in 'P' mode. This mode lets the camera make all the decisions but lets me influence them. In this instance my influences were setting the camera to ISO 800 and using the fluorescent white balance. The film speed gave it enough light to properly expose the shots without using a flash, while the white balance matched the lights in the library.

Now all I had to do was follow my kids around as they looked at books. But even there I used a specific technique. In this shot, I crouched down so the camera was on the same level as my kids. This simple change in angle of view really changes the whole feel of the photo because it is as if we are seeing the world from their perspective. It's subtle, but can have a powerful effect.

As to what I would change, I wish I had a little more shutter speed. The camera was fooled a little and overexposed the shot, but I was able to dial it back down using Adobe Camera Raw adn Photoshop Elements. If the camera hadn't been fooled, however, the shutter speed would have been a little faster and maybe I wouldn't have gotten the slight motion blur in Morgan's hands.

Oh, and one more thing — why in the world are they holding the book upside down?

September 30, 2009 - Peanut butter chocolate kiss cookies

1/13f5.6ISO 40055mmRAW

Welcome to one of my all-time favorite cookies. These peanut butter chocolate kiss cookies are so easy to make but so hard to stop eating, especially when you have a cold glass of milk with them!

I took this photo as the cookies were cooling. We had just pulled them out of the oven and placed the chocolate kisses on each one. The heat from the cookies was melting the kisses in place. That's why there is a sheen on the kisses — they're liquifying.

I shot this in RAW and without a flash, using the light from the stovetop. I used my image-stabilized 18-55mm lens, which allowed me to take the handheld shot at an incredibly slow 1/13 of a second (it probably helped that I braced my elbows on the countertop as I held the camera).

The reason why the shutter speed is so slow is because I was pushing the aperture to as small as possible to get a deeper depth of field. When focusing this close to your subject (the cookies were only about 12 inches away), your depth of field is really shallow and you need a smaller aperture to get more in focus. In particular, I wanted this shot to have a whole cookie in focus, and f5.6 allowed me to do this.

Thanks to the RAW format, I had good control of converting the color to true white using Photoshop Elements and Adobe Camera Raw (it comes bundled with PSE). I have tried setting my camera's white balance to incandescent so it will match the light bulb under the stove's hood. But for some reason this light gets all wacky anyway, so I have to correct it using PSE.

Even though I shot this in landscape format, I liked the resulting crop better as a vertical. I think it brings more attention to the in-focus cookies in the lower third of the shot (rule of thirds!). I also add more feeling of depth to the shot by having one row out of focus in front and three rows behind.

I really like this shot a lot. If I had to nitpick anything, there would only be a couple. First, I think the kiss in the very front has an odd, slightly distracting shape. And second, I wish the two kisses in focus had more of a reflective shine like the ones in the back.

I am not sure why, but I really like taking food shots. I often find myself studying the food shots in elaborate restaurant menus, trying to figure out what makes each photo so nice, so effective. Then I try to keep those things I notice in mind for the next time I shoot.

I think I am getting better. What do you think?

Wednesday, October 7, 2009

September 29, 2009 - Deliciously disgusting cake

1/80f5.6ISO 40018mmRAW

I'll admit up front, this isn't going to be easy to explain. That thing on the table is a cake. It is also supposed to be meatloaf. But in actuality, it's really supposed to be a monster's foot. Make sense?

Don't worry, it didn't make sense at first to me either.

Here's the explanation. I work as a programmer at HowStuffWorks.com, and we just launched the TLC Cooking portion of our website (which you can find at recipes.howstuffworks.com). Being in a celebratory mood, the folks at TLC headquarters wanted to send us us a large cake for everyone to eat. But they didn't want to send just a plain cake — oh no, that just wouldn't be fun enough. They wanted to send a special cake that would look like one of the dishes from the recipes on the new site. But what recipe did they pick? One from the Halloween section called Feet of Meat!

So in honor of our accomplishment, we got to eat cake that was meant to look like a cooked foot of some Halloween monster. How appetizing.

In today's shot, our editor in chief, Conal Byrne, had just cut off the first piece of cake (for those wondering, it was the big toe), revealing to everyone that the cake was red velvet, creating a great illusion of raw meat inside. Everyone either laughed, gasped, or gagged. But what would you expect? Even those on the other side of the cake (who couldn't see the red inside) still saw the blood red cake stuck to the knife as he pulled it out of the cake. Yum, nothing like simulated red meat!

I took this photo just at the height of everyone's reaction. I like the candid emotions and reactions caught on their faces. It was a prime moment, and it can be hard to catch these kind of reactions. If I wasn't ready with the camera when the moment happened, I would have never caught it. Of course, it helped that I knew the cake was red velvet and I was expecting a good reaction. A little planning and anticipation can go a long way in getting great photos.

I used my dedicated flash and bounced it off of the ceiling to get a nice even amount of lighting in the whole room. This technique also eliminates the vast majority of shadows in the room, which helps add to the overall effect of the photo.

I purposely cropped it very wide to eliminate all of the dead space in the upper and lower portion of the photo. This helped draw attention to the most important parts of the photo, the cake and everyone's reaction to it. I just wish it wasn't so dark in the back corner. Maybe I should have had my flash pointing a little more forward instead of just straight up.

September 28, 2009 - Caught red-handed (again!)

1/60f5.6ISO 40055mmRAW

I've been caught red-handed again. Twice in the same week I have missed a day, and I don't have anything to post for today.

(Ugh. I feel so ashamed . . . .)

So, in honor of how I feel, today I have posted a photo taken by my daughter, Leigh Ann, when she caught me red-handed as I was licking the chocolate chip pumpkin muffin dough off of the spatula we used back on September 20th.

She saw me taking photos that night, and after I had put the camera down she asked if she could get some photos herself. I said yes (of course) and away she went snapping photos. Little did I know she would get such a good one!

September 27, 2009 - Homemade spaghetti and meatballs

1/30f2.8ISO 40050mmRAW

Just a quick one tonight. We had spaghetti and meatballs today and I just couldn't resist another food shot. This was taken while the meatballs were simmering in our cast iron skillet with the spaghetti sauce.

I did quite a bit of contrast control in Photoshop Elements to get the photo to have enough snap to it. I am sure glad I shot it as RAW so I could have more control over how the final picture came out.

I like the way it turned out, especially with the bubbles that show it was simmering. What do you think?

September 26, 2009 - Beautiful day in Buckhead

1/1000f7.1ISO 20030mmRAW

Well, I have finally done it. I missed a day. I was going to try to sneak this past you, but then thought surely someone would catch that the metadata for the image clearly showed it was taken on Sept. 25th and not the 26th and I would have a huge Internet scandal on my hands that make my life a living nightmare.

But then I thought, why not admit it? I'm not perfect, just like David Letterman isn't perfect, and if he can admit his shortcomings on national TV then I can surely admit mine to the world.

Whew. That feels so much better.

On to the picture. The cloud cover was just gorgeous today (oops, I mean yesterday), so I got a good shot of the office building and condominium you can see from the 15th floor deck at my office. And because my floor is roughly halfway up the height of these two buildings, I don't get any perspective distortion.

Based on the image data, it looks like I had the camera in 'P' mode, which means the camera made most of the decisions for me (which is generally fine for a photo like this). My only post-production thought was if I should take out the tower crane or not that is protruding on the right side of the image. Since I am so far behind in making my daily posts, I decided not to.

What do you think, should I have?

Sunday, October 4, 2009

September 25, 2009 - Tannah and Spot

1/400f2.5ISO 160050mmRAW

Tannah had the privilege of bringing home the class pet for the weekend. She had so much fun with Spot today that I just had to get a photo of the two of them together.

Just like many of my other black and white photos, I had her sit down by the large living room window and used the natural ambient lighting to illuminate her. I used the higher ISO setting to create some graininess in the photo, and the wide f2.5 aperture to blur out the background.

I don't have any regrets with this photo. I had taken about a dozen different ones with her and Spot, and this was the best. I think it does a great job of capturing her happiness and contentment. What do you guys think?

September 24, 2009 - Cleaning up from the flood

1/50f4ISO 40027mmRAW

I went to watch Emma at tennis practice today and heard some commotion in the woods behind the tennis courts. I found a county crew trying to clean out this massive drainage pipe, which had become clogged sometime during (or maybe even before) the flooding we had.

The pipe is what a small creek flows through as it goes under one of the roads in our neighborhood. Normally, the creek doesn't have much more than a trickle flowing through it, but was fairly raging during the flood because at least 20 yards empty into it just from our neighborhood alone.

Because of the clog, the creek backed up until it flowed over through one of the houses and over the street. Then it joined up with a larger creek and flooded out the tennis court and swimming pool area. The county crew was trying to clear out the clog so they could send an engineer into the pipe to inspect it for washout damage under the roadway.

This photo was kind of challenging because of the lighting. We were in the thick trees, but there were several open spots that was letting in quite a bit of light. This light was confusing the camera and making it underexpose the majority of the photo. I put the camera into 'P' mode (which on my Canon is one spot away from the fully automatic green mode). This allowed the camera to make all of the adjustments it thought it needed but also gave me the chance to override it.

Since the camera was underexposing the photo pretty severely, I used the exposure compensation setting to overexpose the shot by nearly one full stop. This canceled out the camera's confusion and gave me the exposure I wanted.

I wish I could have used the camera's flash, but that would have drawn a lot of attention to me and I wasn't sure I wanted it. I was worried a little that they might complain if it became obvious I was photographing their work. But if I could have used a flash it would have helped light up the shadows of the photo, especially in the pipe.

September 23, 2009 - Church volleyball


1/500f2.0ISO 160050mmRAW

Getting a photo today was a challenge. I was busy all day, and then had a church youth group meeting after dinner. But when I showed up they were getting ready to play volleyball, so I pulled out my camera.

I quickly figured out, however, that the lighting in our church's simple gymnasium was pretty bad. I had to use my 50mm f1.8 lens, open all the way to f2, in order to get enough light (at ISO 1600) for stop action photos.

To make matters worse, this lens doesn't have a quick autofocus, so many of my photos were out of focus.

Here is one of the few acceptable ones I feel I got. It was taken during the serve and I cropped in on it to focus on the concentration on his face and the blur of the ball as it was hit. This blur really helps add a feeling of action to the shot.

Because of the light colored room divider behind him, the camera was fooled and it underexposed the photo a little. That is why it is so grainy. When shooting at high ISO's, it is vitally important to properly expose the photo during the shot. This will help reduce the graininess of the photo. The more you have to fix the exposure after the shot with your photo editing software, the worse the grain will be.

The lighting was also casting a horrible color that was really hard to nail down in post-processing. Due to being so behind in my posts, I didn't spend much time on it.

Thursday, October 1, 2009

September 22, 2009 - Damage from the lightning?

1/60f5.6ISO 40018mmRAW

My neighbor, whose lightning strike I told you about in yesterday's post, had a bunch of electronics blow out in his house. How? The water pipe from the city supply ran through the roots of the tree. The lightning's charge traveled down the pipe and into their house.

Thankfully, we were more lucky. We didn't get any lightning strikes. But for some reason the DVD player was dead when we tried to use it today. Today's photo is of Joshua trying to get Tannah's favorite movie out of the player.

I used my dedicated flash pointed up into the ceiling, as I described in the third paragraph of Sunday's post about making some muffins. I composed the photo with Joshua off to one side and the player at the bottom to kind of frame the image a little.

I just wish I had left the armoire door so you could see the TV inside. That would really help set the photo properly. I also wish I had put a little white card behind the head of the flash so it would have bounced a little light into Joshua's face.

September 21, 2009 - Lightning strike too close to home

1/30f5.6ISO 40018mmRAW

Today's photo is more of a fun snapshot. Last night we got a ton of rain — officially seven inches. And the worst of it came down during a horrible lightning storm.

Near the end of the storm (around 5 a.m.) I heard a loud SNAP, followed immediately by a massive thunderclap. It clearly came from somewhere in front of the house. I thought for sure one of our trees had been struck.

In the morning we found out it was the massive poplar tree across the street in our neighbor's yard. In the photo you can see the strike went clear down to the ground, shattering off bark and wood as it went. Tannah is holding one of the pieces (which we had found in our yard) that had splintered off from the strike.

This is a straight-forward shot. I used my wide-angle lens to get as much of the 80-foot tree as I could, but I didn't want to step much further back so you could still make out the streak down the tree. I included Tannah to help give some relevance to how big the tree really is.

In hindsight, I should have shot it at ISO 800 or open up the aperture to f4. This would have increased the shutter speed to 1/60. I could have also had Tannah hold the piece of wood more to the side so you could make it out clearly. The way she is holding it in the photo makes it hard to visually separate it from her torso.

PS — this rain was the start of the great Atlanta flood of 2009. Luckily, we didn't get much more during the day. But some parts of the Atlanta area got two to three more inches as the day went on. I don't have any photos of actual flooding, but I will have some more rain- and storm-related photos coming up.

Monday, September 28, 2009

September 20, 2009 - Making pumpkin muffins

1/60f5.6ISO 40020mmRAW

Tonight we made a treat — chocolate chip pumpkin muffins!

I used my dedicated flash to light up the kitchen. I pointed it straight up so it would bounce off the ceiling and create a brighter, broader light. It did a good job.

I set the camera on manual, with the shutter at 1/60, aperture at f5.6, and ISO at 400. For indoor shots with a flash, these are my favorite settings. The camera does a great job of figuring out how much flash to use, and my Sigma EF500 Super flash has plenty of power.

The 1/60 shutter speed does a good job of stopping action, while the f5.6 aperture usually creates a good depth of field for indoors. With the film speed set at ISO 400, it's fast enough to light up most of the room and have a slight (yet pleasant) light falloff towards the back.

I composed this shot specifically. I got in close to Tannah and down on her level so you could easily see her. I arranged the simple ingredients so you could see what they were. Because I focused in close, the depth of field in this shot was fairly shallow which helped put the messy counter behind her out of focus (which helps reduce its distraction yet convey enough to easily convey that this is a kitchen).

I like this photo. It really captures the idea well of making something with my kids. Leigh Ann was helping a little, too. And when she wasn't helping, she took my camera and took some photos of Tannah and I working side by side.

By the way, the recipe is really simple. One box of spice cake mix, one bag of mini chocolate chips, and one regular-sized can of pumpkin. Mix it all up (no water needed) with a teaspoon of nutmeg and put it in muffin tins. Cook them at 325° for 10 minutes (for miniature muffins, longer for regular ones) and enjoy!

September 19, 2009 - Flower on a rainy day

1/25f8ISO 80049mmRAW

I am sure you have all heard about Atlanta's great flood of 2009 by now. This photo was taken two days before the flood happened. It had been raining for five straight days for a total of about seven inches so far, according to my rain gauge (a large bucket) in my front yard.

My youngest daugher, Tannah, was attending her best friend's birthday party. It was supposed to be at a petting zoo/animal ranch, but the rain had forced those plans to be canceled and the party was now at their home. When I dropped her off I saw their beautiful flowers on their front porch. I got this picture when I came back to pick her up.

The sky was completely overcast (and dark, too, because it was raining as I took this). While kind of gloomy, it offered a very even lighting. I made sure to take this in RAW format so I would have plenty of processing options later on when I loaded it into the computer. And I shot at f8 to have a good depth of field in the photo, which helped more of the flower be in focus.

I pumped up the exposure and contrast in Adobe Camera Raw, while also darkening the blacks a little bit to help keep the background dark. I didn't really like the flower in the background in the upper right, so I burned (darkened) that quite a bit to make the main flower separate from it more.

So what do you think? Overall, I think it is pleasant, but not a knock-out. The overcast skies provided even lighting, but I wouldn't consider it dynamic. I am worried I darkened the background too much and affected the overall mood of the photo. I also didn't have an umbrella as I was taking the photos, so I was a bit rushed (it wasn't a light rain!) and I didn't take my time. Ideally, I would love to find some flowers like this immediately after a storm is over with the sun coming out.

PS &mdash I would really like to know what kind of flowers these are. Anyone know?

Sunday, September 27, 2009

September 18, 2009 - Joshua's black and white

1/400f2.2ISO 160050mmRAW

I finally got my oldest, Joshua, to pose for me at the same window, so this completes the set I wanted to do of all my children. And just like the others, everything I said about the first photo applies here, too.

I'm going to break with my traditionally explanation and talk about what I don't like first — that finger resting on his upper lip! I really like the pose, but the finger is very distracting. He was moving around as I was taking the photos (almost like he was modeling for me) and I tried to get him back into the same pose but with his fingers resting on his chin instead, but I was unsuccessful.

Having said all that, I like this photo. The lighting for this portrait is probably the best of the bunch. One thing I did differently is I put my 52-inch round white reflector just out of the picture to his right. This bounced a little bit of the window light back into the darker side of his face, which really helped lighten up his eye.

Now that all five are done, Rachel and I aren't sure we like all of them. There are a couple we feel really capture the kids' personalities (like Leigh Ann and Tannah), but we worried some of the poses are too similar (Rachel wants variety in each kid's pose). We will probably take some of these again until we feel we have what we want.

Tuesday, September 22, 2009

September 17, 2009 - Slight reprieve in the rain

1/250f7.1ISO 40055mmJPEG

The rains held off for a while, and the tree guys came out to make good on their promise. While it is not perfect, my yard looks a lot better now. And since it wasn't raining, they went ahead and cut down the last tree.

Since the ground was still wet and borderline soaked, they cut the tree up into pieces and used a rope to lower each part to the ground. This technique was also used to make sure nothing fell on the power lines going to my house, which were only a few feet away. It also allowed them to haul the trunk off in pieces instead of having to use the same logger truck from the day before (the owner told me he wasn't going to use that guy again).

To help properly illuminate this photo on such an overcast day, I used my dedicated flash. The camera was being fooled by the bright white sky, so I told it to over-compensate on the flash by one full stop. I thought this did a nice job of brightening up the photo without making it look unnatural.

This is a great example of why you shouldn't be afraid to use your flash in the middle of the day. Without it, the photos turned out much darker. Why? I was aiming up into the underside of the tree, and just 25 feet away was my dark brown house (which was acting more like a light sponge — soaking up the light).

Before using the flash, the tree and the tree cutter were much darker and lacked detail. With the flash, everything looks more like you would perceive it with your natural eye.

September 16, 2009 - What a mess

1/40f4ISO 80020mmRAW

Between cutting down four trees yesterday and this morning, we must have had around three inches of rain fall. And it was still raining. So I went to work, thinking surely there was nothing that would happen today with the tree cutting.

Oh, how I was wrong.

My wife, Rachel, called me around 11 a.m. and said the logger truck showed up and they hauled away the tree trunks that had been felled from the day before. She was busy upstairs when they must have arrived because she didn't realize they were there until the last log was being dragged through the mud to their truck down on the street.

When I got home, this photo shows what greeted me.

I called up the tree cutting service, and the owner apologized. Profusely. He said the logger truck (which is run by a sub-contractor) had permission to pick up the logs yesterday (before the rain started coming down) but he shouldn't have come today. Not after all the rain. And he was especially wondering why in the world the guy tried to do it while it was still raining.

So for my photo today, you get something more like a snapshot. I took a bunch of photos to show what kind of damage was done in case I wasn't going to get any relief from the tree service. This was taken as I was standing in the street where the truck had been, showing how all the logs would've been pulled towards down the slope in front of my house.

They promised to come back out tomorrow, rain or shine, to get this cleaned up.

Saturday, September 19, 2009

September 15, 2009 - Up in the trees

1/320f4ISO 800150mmRAW

We had a tree cutting service come out today to take down some dead, diseased, and damaged trees. There was a lot of activity and they were under the constant threat of rain, which made them work even faster.

The guy who climbed the trees had been doing it for years, and was very good. I got up on my roof to take this photo. By getting up on the same level as him, it allowed me to put a background of treetops behind him instead of the overcast sky. Our front yard slopes down to the street (by about 25 feet), so he was about 40 feet off the ground as he was making this cut.

I used my 70-200mm f2.8L lens so I could get a good, up close shot of him with all of the chips flying. I set the white balance mode to cloudy, and then added in more contrast in Photoshop Elements. And the shutter speed was in that magic range where most of the falling chips were frozen in air but the chips coming right off the chainsaw are slightly blurred. This really conveys the action of the photo.

I love how I caught a look of utter concentration. I also wanted to leave some negative space at the bottom (to help convey how high he was) but was careful not to include too much (which would have made him smaller in the photo).

I really like this photo, and I not sure if there is anything I would have changed. What do you think? Do you have any suggestions on what could have made this better?

September 14, 2009 - Biscuits

1/30f8ISO 80050mmRAW

Today I made one of my favorite foods — biscuits! I took photos of both the preparing process and the finished product. Since I just recently put up a photo of making cinnamon rolls, I decided to post the golden brown finished product.

I shot this at a shallow angle so I could get the full range of focus zones in the photo. There are out-of-focus biscuits in the foreground and background surrounding the in-focus biscuits in the middle. This gives more depth to the photo and adds to its visual appeal.

I used the rule of thirds by putting the area of sharpest focus in the lower right third of the photo. I also cropped it in close to give more attention to the area of sharpest focus. Finally, I corrected the white balance and pumped up the contrast and color saturation.

I only have one regret &mdash I wish I hadn't eaten so many of them!

September 13, 2009 - Twilight overcast sky

1/15f5.6ISO 40018mmJPEG

I had been inspired recently by Bill Warren's outstanding photo collection of the world's largest tourist trap (called South of the Border on I-95 in South Carolina), so when I saw a chance to get a similar photo, I jumped at it.

I took this on an overcast day right as the sun was setting. It was bright enough to see, but dark enough that many businesses had their colorful lights and signs on. There was a balance to how bright the sky was compared to the business lights.

After I loaded the photo into Photoshop Elements, I lowered the exposure, increased the contrast, and pumped up the saturation a little. Even though I accidentally shot this as a JPEG (I had left it in JPEG mode after the tennis match the day before), I still used Adobe Camera Raw to edit the photo. How did I do that? I just selected 'Open As...' from the menu in the Editor, found my JPEG image, and chose to open it as a Camera RAW image in the dropdown menu at the bottom of the 'Open File' window.

The hardest thing for me was getting the photo to appear straight. I hadn't brought a tripod along, so I had to hand-hold the camera as I was shooting. The light was fading fast, so while the pictures I had started taking a few minutes before at ISO 400, I should have adjusted to ISO 800 for this one.

To make things harder, I was standing on the tall cement base of one of the light poles around the station so my angle of view would be a little higher and I wouldn't be aiming the camera up so much. I had to hold onto the pole with one hand while shooting with the other. It's amazing that a photo came out clear at all. I guess that really speaks to the technology put into these image-stabilized lenses that Canon is producing now.

I wish I had waited around a few more minutes and gotten another set of photos when it was almost dark.

I also want to go back and see what I can do to dial down the blue in the sky. I think if it was more grey, then with a little selective burning and dodging (lightening and darkening) I could make this look like a real stormy sky.

Thursday, September 17, 2009

September 11, 2009 - Studio 1A at HowStuffWorks

1/30f3.5ISO 80021mmRAW

There's a good chance some of you have heard of HowStuffWorks.com, which is where I work (especially since I know some of my co-workers are following my 365 project). We have several outstanding podcasts, including one by Josh Clark and Chuck Bryant called "Stuff You Should Know."

(If you haven't heard it, you should check them out. They are available in the podcast section of iTunes. You'll probably find them in the Top 10 list.)

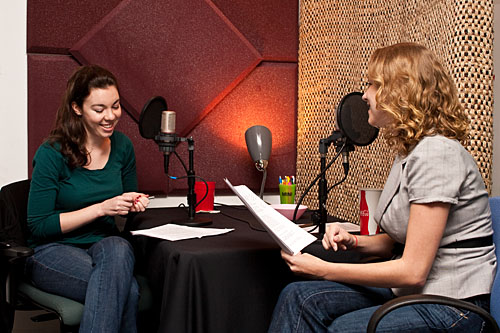
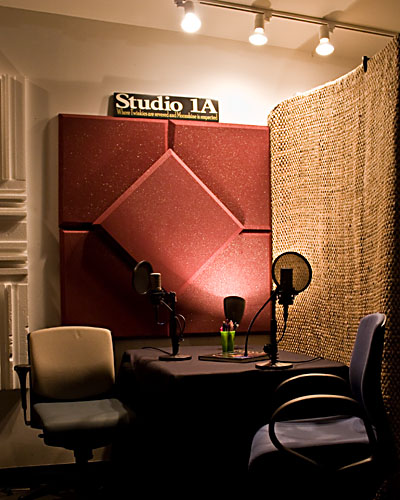
Anyway, yesterday Chuck asked me to get a photo of the recording studio. It seems some of the listeners wanted to see where they recorded their show. He also had received a wooden sign from a fan that depicted the name of the studio, and he wanted a shot so he could put it on his blog post. This way he could accomplish two things at once.

Today's photo is the result. After seeing how dark the studio is, I kinda wished I had brought my tripod to work. So I pulled out my image stabilized lens (which also happens to be my widest lens), set the ISO to 800, and played around with the aperture until I got a shutter speed I knew I could shoot with while hand-holding the camera.

I noticed the lights seemed to be all florescent bulbs, so I waited a few minutes until they all got as bright as possible (sometimes the CFL bulbs take a few minutes to reach full capacity). I shot it as RAW so if there were any problems with the coloring (even after putting the white balance to florescent) that I could have maximum control in correcting it.

While the photo may make the studio look fairly nice and orderly, it is quite the opposite. To the left of the table (by about three feet) is the sound engineer's work desk, complete with all of her controls, computers, screens, and everything else she uses (Jeri, you do a great job!). To the right of the table (and behind the thick woven fabric hanging over the wall) is the green screen portion of the studio where they shoot their video podcasts. It is a mess of cords, lights, stands, and other studio gear.

Because I was selective in what I excluded from the photo, the resulting shot is much stronger. I always try to keep that in mind when I shoot. Sometimes you can't help but have distracting backgound elements, but when you can minimize or eliminate them, your photographer will be much stronger.

Finally, I regret not being able to talk Josh and Chuck into sitting at their chairs for the photo. Both of them love what they do (after all, who doesn't like to just sit down with a great friend and just shoot the breeze about current events?), but they don't always like the publicity and fame they are getting. Ever the humble journalists, they turned down my request.

September 12, 2009 - Emma's first tennis match

1/3200f2.8ISO 400200mmJPEG

Emma and Leigh Ann got to play in a practice match today. This was the first time for Emma. She is just starting to learn the game, but she does a really good job of hitting the ball. She just needs to keep working on getting into position to hit. She did that here.

I shot in JPEG mode so I could get a bunch of shots (my camera in RAW mode will shoot only six successive photos whereas JPEG mode gets somewhere around 20). I also put the camera in "sunny" white balance mode since most of the tennis court was in full sunlight. Finally, I put the camera on my monopod to help support the weight of my 70-200mm f2.8L lens.

As I followed Emma around with the lens, I kept the zoom a little wide so I wouldn't have any problem keeping her in the lens. I shot horizontally because I feel that works very well for tennis, especially when a player is swinging at the ball (like Emma is).

Because the aperture is set to a wide f2.8, the background is slightly out of focus. Emma was close to the sideline when I got the shot, so that is why the fence isn't more out of focus.

In the final print (which is what you see), I cropped the photo in quite a bit to focus the attention on just Emma and the tennis action. The inside of her forearm was overexposed, so I tried to back off the brightness there. This is one area where shooting RAW would have helped. RAW contains more image data in the bright areas, which allows you to pull back from overblown hightlights when you use something like Adobe Camera Raw (which you can find with Photoshop and Photoshop Elements).

The 1/3200 shutter speed did a great job of freezing the ball on the strings of the racket. One thing I could have done differently is slow the shutter speed down. It can be tricky to do this, but there is a balance where you have a fast enough shutter speed to freeze the player, but slow enough where the ball is still a little bit of a blur. This effect does a great job of conveying the idea of motion in the photo.

The better the skills of the players (and the harder they hit the ball), the easier it is to find a slow enough shutter speed to do this. However, since Emma and her partner are just getting started, the game was very slow and it might have been impossible to achieve this effect.

Tuesday, September 15, 2009

September 10, 2009 - Homemade cinnamon rolls


1/100f2.2ISO 80050mmRAW

As you might be starting to tell, my wife and I love to cook. Today, she made some simple cinnamon rolls. I got this photo as she was using dental floss to cut each one away from the big roll of dough.

I used my 50mm f1.8 lens in order to get a fast enough shutter speed in the weak light under the table's lampshades. I also knew that this lens produced an extremely sharp photo, which I wanted.

I got in pretty close to Rachel's hands to concentrate on what she was doing. I wanted to include the tray of cinnamon rolls in the background, and I also liked the splattering of flour spread around the work area.

But I didn't need to include anything else in the photo. This was definitely a case where leaving out stuff was as important as what you leave in.

Even with setting the camera to tungsten lighting (to match the bulbs over the table, I still had to adjust the lighting in Adobe Photoshop Elements so the flour would look white.

The one thing that I wish I would have done is move the little red cup that she used to mix up the cinnamon and sugar. She emptied the cup, so you can't tell what it was used for just by looking at it. Worse yet, it is really red, which makes it stand out like a sore thumb.

But I also didn't have a lot of time. Rachel usually doesn't want to wait for me to make a photo perfect, so she just keeps working when I pull out my camera (sometimes I think she works even faster). She had already gone through one roll of dough and was starting on the other one when I pulled out of my camera. I got only five or six shots before she reached the end of the roll.

Sometimes if you think too much and try to make a perfect shot, you wind up missing the shot altogether.