Saturday, September 5, 2009

September 2, 2009 – Capturing facial expressions

1/250f2.2ISO 160050mmRAW

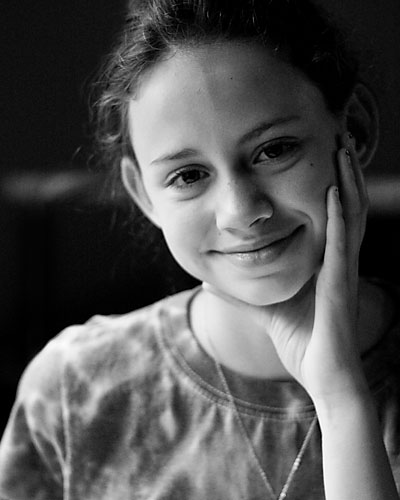
I had so much success with yesterday's post that I went back and did the same thing with another daughter (in case you don't know, I have five kids &mdash one boy and four girls). And just like the previous post, everything I said about the first photo applies here, too.

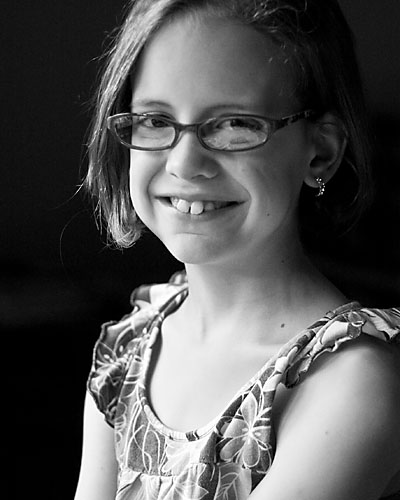
Emma remings me so much about myself when I was her age &mdash reserved and quiet at times. But she had seen the photos I had gotten of her sisters and wanted a good one of herself, too. So she really worked with me and made it easier.

While I don't think her expression is quite as precocious as Tannah's, I love it anyway. I feel like she is exchanging a knowing smile with me, like she knows what I am thinking and she agrees.

If you can capture expressions in your subjects that convey a feeling to the viewer, then you are doing a great job with your photography. It's something hard to do, and there will be times that you start to feel like you're doing it, and then you go for a long time without any luck (it's what makes quality photography such a joy to acheive).

If this happens to you, don't despair. Just keep clicking away.

As for what I wish I could change, I shot this too loose and had to crop this in quite a bit to get the composition you see. As you know, my wife wants an 8x10 of each child, and I worry that I had to crop in too much to get a good 8x10 out of this.

September 1, 2009 – Mischievous!

1/250f2.2ISO 160050mmRAW

Same time &mdash same place, and the result is the next black and white photo of my kids. Everything I said in the previous post applies here, too.

This is my youngest child (only 4-years-old), and she really moved around. I kept shooting through it all, hoping that I would get a good one. And get a good one I did. I just love her expression! When you look at this, don't you wonder what she is thinking?

One thing I did while shooting her photo is I kept talking with her. I asked her questions about the doll she was playing with, how pre-school went for her that day, and what she wanted to eat for dinner. It helped her to keep looking back at the camera.

The only thing I wish would have been better was the focus point. Because of her constant movement, the focus point wasn't her closest eye, but instead seemed to be somewhere closer to her leading shoulder. In a web shot like this, it is not so noticeable. But we want to make an 8x10 of this for the wall and the soft-focus might be too much for a print that size.

Thursday, September 3, 2009

August 31, 2009 - Self portrait

1 secf8.0ISO 20029mmRAW

Well, it finally happened. I finally had a day where it was getting time to go to bed and I hadn't taken a single shot yet. I was sitting at my computer, trying to update the blog when it hit me.

Oh, crap! I thought. Here it is at 10:15 p.m. and I haven't taken any pictures!

I sat there wondering what I could do for a couple of minutes when inspiration hit me — do a self portrait!

I wanted this self-portrait to be realistic, to reflect how I usually do my photo work. So it had to be fairly dark. It might not be best for my eyes, but I tend to sit with the lights off so I can see the photos easily.

I set up my camera on a tripod, took a few practice shots, and then got serious. I realized right away that letting the light spill in from the kitchen didn't work for a pleasing portrait. So I attached my dedicated flash to the camera, pointed it at the ceiling, and set it to shoot in manual mode at 1/32 power (in case you're wondering, 1/2 power was enough to brightly light up the room).

I decided on ISO 200 and a full second exposure time (obviously I put my camera into manual mode in order to do that) to get a balance between a fast enough shutter speed to prevent motion blur and a slow enough film speed to prevent heavy graininess in the dark areas.

I also set the camera at head level so the angle of view might be like you were sitting down with me to look at the photos. Finally, I tried to eliminate distractions in the photo, so I cleaned up my desk (and put all of the junk on the floor). What you see in the photo is what I wanted you to see.

From beginning to end, this shot took less than 15 minutes to create, and that included using the 10 second timer on my shutter (I would press the shutter button, and then have 10 seconds to climb into my chair and position myself).

In hindsight, I wish I would have taken the time to set the camera to a wider angle (maybe more around 18-20mm) and move it closer to me and the screen. This might have further enhanced the perspective of you sitting down with me.

Tuesday, September 1, 2009

August 30, 2009 – Window light portrait

1/100f2.2ISO 160050mmRAW

I felt like I was getting into a little bit of a rut (especially since it seems that many of my photos were of buildings, flowers, or bugs), so with today's submission I am going back to two things that will make my wife happy — one of my kids and black and white photography.

My kids were sitting at a little white table by our front window, doing a little bit of crafting. I was helping them out, and it suddenly struck me this would be a great location to get some good black and white portraiture. The window faces north, so it never gets any sunlight shining directly through it. Therefore, all of the light is this beautiful, soft, ambient light.

Notice the pleasing effect this indirect light has — it softly wraps around her face. And while part of her face is in shadow, it isn't a harsh shadow. This lighting also does wonders to make the photo look more three dimensional. The soft shadows do a great job of showing the contours of her face without creating something harsh and unflattering.

Because I already had black and white in my mind, I did three things. First, I set my ISO to 1600, which will produce a grainier photo than normal. Second, I wanted to create a narrow depth of field, so I pulled out my 50mm f1.8 prime lens and set it to f2.2. This gave enough focus to grab my daughter's face, but it still threw everything in the background out of focus. And third, by turning all of the lights off in the room I created a dark background that will not only help focus attention on my subject but also give me a chance for a deep, rich black.

In this photo, the eyes are the most important, so I focused on them to make sure they looked the best. Everything else blends nicely into an out-of-focus backgroud (this blurry effect is called bokeh). Finally, I cropped the photo to put her eyes in the upper-right third of the photo to follow the rule of thirds. I also cropped out the large rainbow hanging from her necklace. It was distracting, and took away from the photo.

The one thing that I wish I had done for this is remove the darned ironing board from behind her, which created the fuzzy bar that you see in the background.

Brian, I thought about burning out the board, but honestly didn't want to make the effort getting rid of the board but not getting rid of the strands of her hair. So instead, I removed the string that was hanging conspicuously from the end. Thanks for giving me the challenge to do so in my previous black and white photo.

Photography behind the scenes

I came across a couple of items today that went along perfectly with each other. First, I was at a college football site that was talking about schedule posters. BYU has this really nice one.

Linked to it is this great video that shows what happened behind the scenes. There is no explanation, but sometimes just seeing the preparation helps illuminate the techniques to our minds.

Then I found a great entry in Scott Kelby's blog that details the work that went into his fantastic photo shoot of a Army Reserve Medevac unit. I know I haven't included one of his photos in this post, but believe me — they're incredible. Just click here and see for yourself.

August 29, 2009 – Day hike at Stone Mountain

1/100f6.3ISO 40018mmRAW

As many of you know, I am the Scoutmaster for our church's Boy Scout troop. Next summer we are heading to Philmont Scout Ranch for a 12-day backpacking expedition, and today we officially started our preparation. It was nothing strenuous, just a 6.5 mile hike around Stone Mountain with simple day packs. Philmont allows only small groups, so our expedition will have only 12 people. Today's group was slightly smaller than that, but it did include one of the boy's mother.

Because the trail weaved mostly through the dense forest, I put my 18-55 f3.5-5.6 IS wide angle lens so I could capture more of the trail and our hikers. I didn't want to interrupt their pacing (and just capture things as they were happening, photojournalism style), so I set the camera in 'P' mode. This lets the camera make most of the decisions for camera settings, yet allows me to make modifications in case I think the shutter speed is too slow or the shots are underexposed (by the way, the camera did a great job picking).

I kept hiking ahead of the group to find places where I could get a good shot, like this one. The trail curved in front of me, and there was a log I could stand on. I had to wait a few minutes for everyone to catch up, but it was worth it.

My son is in the lead. If you will notice, his hind foot is slightly blurry, which helps convey the idea of motion in the photo. The 1/100 shutter speed was just fast enough to freeze the movement of their torsos but some extremities are blurred.

I shot about five photos at this bend in the trail, but this was the only one that was devoid of bright sunlight reflecting off of their clothing. This one also had some good spacing between the hikers, which is nice.

In hindsight, I wish I had put the people in the front a little higher up in the frame (hmmm . . . maybe I shouldn't have stood on the log). I also wish they were looking up and you could see more of their face. Sometimes it's the little details like this that can change a good photo into a great one.

August 28, 2009 – Tiny little cricket

1/320f8ISO 40046mmRAW

It had been raining today but had stopped by lunch time, so I set out to capture some closeups of water droplets on some flowers. As I was trying to do so, I luckily found this tiny cricket. Just how tiny is he? There are two good indicators -- look at the water droplet on the leaf above him and the tiny hairs on the left to the left. This little guy was less than a half-an-inch long.

Because of its close-focusing capabilities, I used my 18-55mm f3.5-5.6 IS lens to capture this photo. The sky was still overcast, so it provided nice, even lighting for the photo. If you read my post from yesterday, all of the settings are almost identical and it was for all the same reasons — except for the shutter speed. I could have dropped the film speed down to get a cleaner, smoother image and still have enough shutter speed for a sharp photo.

One thing I did specifically do for this photo is change my angle of view to isolate the cricket more against the darker patch in the background. My first shot had him against some of the green leaves, and he just didn't pop out much in the photo. I also cropped this shot so the cricket was placed in one of the corners of the photo, using the rule of thirds.

What do I wish I could have done differently? I could have done a better job putting him directly in front of the dark background, but I didn't have my tripod with me. I was holding the camera while leaning over some flowers, and it was hard to keep still. I am also starting to wish I had a legitimate macro lens, which would allow me for more zooming and closer photos.