Saturday, October 31, 2009

October 24, 2009 - the best Photoshop Elements book

1/60f2.8ISO 80050mmRAW

After my success with using Curves in Photoshop Elements, I am totally convinced this is the best book for digital photographers to use for Photoshop Elements. If you don't have version 6, just look the edition that matches your version. Scott Kelby and Matt Kloskowski do a great job of having an edition out immediately after Adobe releases a new version.

To take this photo, I placed the book on my kitchen table (which has a nice black surface). I stood on a chair to get over the book so I would have more a a head-on view. I used my 50mm f1.8 lens and pumped up the ISO to 800 so I could shoot with natural lighting in the room and not rely on a flash. Finally, in postproduction, I adjusted the color to make everything appear natural.

The only thing I wish I had done differently is pay more attention to the corners. I had clipped the lower right corner of the book while taking the picture. To compensate a little for that, I also clipped the upper left corner when I cropped the photo down to fit on my blog.

And I really do love this book. Can you tell by the roughed up edges to the cover?

Friday, October 30, 2009

October 22, 2009 - Intense sunrise photo


1/100f5.6ISO 80018mmRAW

Thank goodness for being prepared. I have been bringing my camera bag to work everyday since I started this 365 project. This morning it really paid off. This sunrise was happening when I got to my desk.

This photo is actually a photo-merge of two different versions of the same shot. I got the technique from the Photoshop Elements book I told you about back on October 7. I first processed the photo to give great sunset colors and saved it. I then reopened the original, proccessed it foe sunset, and merged the two.


1/125f5.6ISO 80032mmRAW

And this photo is what I saw when I turned around. This is a great example of turning around and looking at things differently. You may be missing a great photo just because it isn't what you originally envisioned.

I wasn't sure what photo I liked more, so I put them both in. What do you think?

October 21, 2009 - Black and white ivy

1/160f5ISO 400175mmRAW

Today's photo is a closeup of some simple ivy against its concrete border. I used my 70-200mm f2.8 lens to isolate just the ivy in the photo and create a nice depth-of-field.

In Photoshop Elements, I increased the contrast and added to the shadows. I also burned in (darkened) the edges to bring more attention to the leaves in the center.

I like this photo a lot. What do you think?

October 20, 2009 - Operation cow drop

1/125f5ISO 40018mmRAW

The Chick-fil-A down the street had a lunchtime festival today. Games, food, and a cow drop. That's right, a cow drop. They dropped 300 mini plush cows — with parachutes — down to crowd of at least 600 people. It was crazy, as the photo shows.

This was a tricky shot. We were outside, but underneath a large, covered plaza between two tall buildings. Both ends of the plaza were very bright, which was fooling the camera a little bit. I put the flash on to make sure that whichever way I was facing the shot would be illuminated. Finally, I took a bunch of shots to try to get something good. And out of about 50 shots, I came up with this winner.

I really like it because it shows a lot of action. There are all the hands reaching for the cow, and the lady in the center isolated fantastically against the clump of people. You can clearly see her business attire — the high heels, short skirt, and white blouse — reaching for a cheap little cow like all the rest (oh, did I mention they all had food coupons attached to them?).

I wish, however, I could have been closer and had more of the faces towards the camera.

October 18, 2009 - A nice warm fire

1/60f5.6ISO 40021mmRAW

The weather is getting colder, so we put some logs in the fireplace today. After the girls got dressed for church, they sat in front of the fire to play.

I bounced the flash off of the ceiling to light up this photo. I took a bunch of photos to get a really good expression from one of the kids, and it worked. I also got down to their level instead of simply taking the photo while standing up. If you aren't doing this yet with your photos, do it — it is a subtle but significant change that will make your photos much better.

October 16, 2009 - Curving tables

1/1000f8.0ISO 160024mmRAW

Today was overcast, so I went about looking for good subjects for black and white photos. This is a set of tables outside a Chick-fil-A. I liked the symmetry of the composition, and I cropped out everything that was detracting from the tables.

I shot the photo at ISO 1600 to add a bit of graininess, and set the aperture to f8 to get all of the tables in focus. In Photoshop Elements, I increased the contrast and filled in the shadows a bit in an effort to mimic old-fashioned black and white film.

In retrospect, I think the photo is kinda plain. Not much to it. What do you think? I am trying to do more black and white photography, so I am going to keep plugging away and see what I can do.

Wednesday, October 28, 2009

October 15, 2009 - Behind the scenes at a HowStuffWorks podcast

1/60f506ISO 40032mmRAW

I lucked out today. For the past several weeks, ever since I made this photo for Chuck and Josh of Stuff You Should Know fame, I have been wanting to get a photo of one of the podcast teams at HowStuffWorks doing their podcast. Well, today it happened.

I happened to pass the recording studio when they were just setting up for a recording of Stuff You Missed inn History Class. I politely asked permission to get some shots, and they agreed as long as it was during their sound check before they started recording. So a hearty thanks to Sarah and Katie for their cooperation, along with Jeri and Elizabeth who are part of the production crew.

For the photo, I got down to the same level as Sarah and Katie and bounced the dedicated flash off of the ceiling. I put the camera into manual mode, dialing in f5.6, 1/60, and ISO 400 for aperture, shutter, and film speed, respectively. I focused about a third into the scene (the microphone by Katie on the right), which helped produce a nice sharp photo from front to back.

I took a bunch of shots and selected this as the best. I felt it showed how much fun these two ladies have when talking about their subjects. Sarah definitely seems to be chucking about what Katie is saying. And if you listen to their podcasts, you know that happens a lot.

Taking a lot of shots also helped me with another problem. When taking photos of people talking it is very easy to catch them in unusual (and sometimes goofy) facial expressions. When you look at someone talk, you don't really notice how many positions the mouth and lips take to form sounds and words. But a photo freezes that motion. So take a lot of shots when you are shooting someone talking. It will give you more of a chance to get a good looking shot that still conveys the idea of talking.

I wish I could have gotten a better angle, however, one that would have shown more of Katie's face. But there was some equipment in the way. Plus, I wanted to isolate the photo on the table where they do their work and leave out the other stuff that is used for the video podcasts. Some of that video equipment is literally a foot behind Katie, but because of how I shot and cropped this picture you wouldn't have any idea if I hadn't told you. This is another good example of how photography can be as much about what you leave out of the shot as what you keep in.

Tuesday, October 27, 2009

October 13, 2009 - Archiving old photos

1/60f2.2ISO 160050mmRAW

This is a rather bland, simple photo. But the underlying significance is huge. This box represents all of my archived photos from before I started using an image management system. It contains nearly all of the photos I have taken since 2002 (sadly, some are missing) and it is sitting beside my desk, open and ready for me to import and catalog them all.

It's a daunting task, but one that I want to get done. I have actually started, but there is a long way to go.

Why would I want to do such a thing? For three reasons. First, those old photos aren't really getting looked at and there are some good ones in there. Second, I sometimes have a past client ask for copies of their photos again. And third, I have a bunch of family and personal shots in there, too. My wife and kids just love looking at their old photos, and it becomes very easy to find particular photos with proper tagging in Photoshop Elements.

That's right, I said Elements. I use Photoshop Elements for managing my photos, and I love it. The Organizer part of the program is fantastic. You can tag photos, add captions, attach keywords, and search everything based on those items. Best yet, you can limit your searches to specific time frames to help narrow your results.

As for my current photos, everything goes into Elements (the current count is nearly 25,000). I have a specific regimen for importing photos and I don't deviate from it. Every photo that goes into Elements gets tagged on import so I can find it later.

I know that Elements isn't as nice as some of the other products out there (like Lightroom), but it was also only $90. And I went through a two or three month period of trying out a bunch of products. I didn't want Elements to win initially (I can be pretty anti-establishment sometimes, and believe me — Adobe is definitely the establishment when it comes to imaging software). But I realized I kept comparing everything I tried to what Elements could do. So I went out and bought Elements.

What kind of organizing do you do? Anyone want to share?

October 12, 2009 - A lack of diversity

1/15f5.0ISO 160032mmRAW

I am the Scoutmaster of our church's Boy Scout troop and we went to the Bremen Jewish Heritage and Holocaust Museum today for an eye-opening look at what can happen when a large portion of society decides to be intolerant of people who are different than themselves.

The lighting was pretty bad for photography, with some displays having plenty of light for photos while others were darker. I couldn't use a bounce flash off of the ceiling because the ceiling was high, open, and painted a dark color. And I usually don't like using a direct flash, so I set the camera to f3.5 in aperture priority mode (the big 'A' on the dial) and set the ISO to 1600 and tried to get photos using the natural lighting. By setting it to the widest aperture my lens (the Canon 18-55mm f3.5-5.6 IS) can cover, it insures the widest possible aperture is used throughout the zoom range.

As you can tell from the photo's settings, sometimes my shutter speed was really slow, even for using a image-stabilized lens. I tried to keep the camera steady by holding the camera with both hands and keeping my elbows close to my sides. In areas where I knew there was less light, I usually held the shutter button down and relied on my camera's high frame rate to take multiple shots in succession.

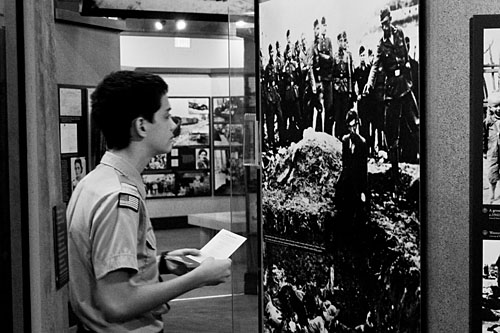
The photo above is from one of those multiple shots. I took three in a row, and the middle one was the best. The first and last had motion blur since my son, Joshua, was swaying slightly as he was looking at the display. This one does have a hint of blur in his face, but you can still see him clearly.

In addition to the light being low, my photos also had a lot of different colors caused by multiple types of light bulbs being used by the museum. It resulted in a photo that looked bad (bad enough so that a viewer might first notice the color instead of the subject). The solution was easy: convert it to black and white. Now that distraction is completely gone, leaving you to think about my 13-year-old son learning about the atrocities the Nazi party — and that's what this photo is all about.

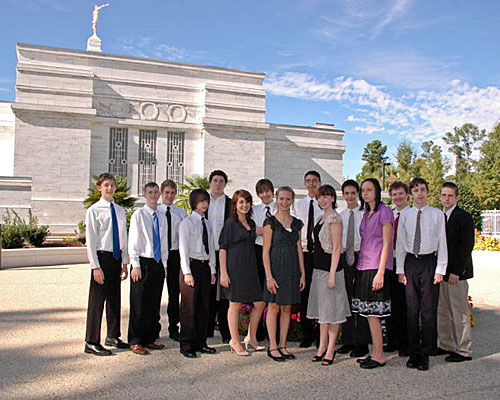
I wish I had gotten a good photo that included more of the troop, but all of those had at least one person moving (and therefore blurry). Remember, IS only helps avoid camera shake by essentially keeping the camera still. Anything under 1/60 of a second will still likely cause motion blur. So in hindsight, I should have set the ISO to 3200 and just lived with the extra graininess that comes with it.

By the way, the Bremen is fantastic. It present a powerful collection of photos and information that cover the Holocaust from just before the rise of the Nazi party to the migration of thousands of Jews to Israel after the war. Plan on being there for at least two hours to soak in all of the information. We were there for an hour and a half and it wasn't enough.

It isn't a place for little kids, however. It doesn't do much to hide the atrocities of the Holocaust. And I am glad it doesn't. It helped my son and I have a candid discussion about the war and the Holocaust.


Monday, October 26, 2009

October 11, 2009 - Sunday morning coloring

1/60f5.6ISO 40040mmRAW

I really like today's photo. There may not be much technically masterful about it, but it shows two of my daughters doing one of their favorite things — coloring with their extensive set of tinted, sparkly glue. It's almost as fun as finger paints, but the colors are shimmery and fantastic.

And best of all, Emma and Morgan can really create some dazzling artwork . . . well, at least in my eyes they do.

Once again, I put the camera into manual mode and used my favorite settings for photos with a flash. I find this setting really helps the camera by taking out a bunch of guess work for it to do. Instead, it's like you're telling the camera, "Okay, here's the shutter speed and aperture. All you need to do is figure out the right amount of pop to put into that flash." And by reducing the options, the camera excels.

As for the flash, I used my dedicated Sigma EF-500 DG Super flash and pointed it up at the ceiling. I also zoomed in with the lens some to help isolate the girls and their fun from some of the distracting background in the kitchen.

In hindsight, I wish I had gotten some pictures a few minutes later when their art on the pages in front of them would be more complete. This would really help bring out the idea that they were coloring.

What do you think? What would have been better?

October 10, 2009 - Youth temple trip

Today I accompanied about half our church's youth group to Columbia, South Carolina, for a church activity. It was an all-day trip and I enjoyed being there very much.

When we were done, we gathered outside for a group shot. My camera bag was left home accidentally ("You asked me to pack it? Honest, Dad, I thought you said you were going to put it in the van!"), but one of the kids brought his Nikon D70. It was a little unfamiliar to me (remember, I shoot Canon), but I think I pulled off a decent photo.

I put the group in the shade of some trees to keep the sunlight off of them, but then turned on the camera's built in flash to make them brighter. Otherwise, the bright white building in the background would have over-powered the exposure, leaving them in the dark. I also dropped my shooting level down a little bit to make it easier for me to include the whole spire and statue in the shot.

I focused on the kids (which I think caused the Nikon to set the exposure mainly based on them) and then recomposed the shot to where they were in one corner and the angel atop the spire was in the other. I also helped them stand as a group, staggering each one so all of their faces were easy to see.

I definitely wish I had paid more attention to if I was keeping the camera level. It seems obvious to me that the shot is a little crooked. And there are two or three kids that are in less-than-ideal poses, which drives me crazy. I try to notice these kind of things when I shoot, but I don't always remember.

I apologize for not having any of the settings for the shot, but I was given a copy of the photo and it had lost all of its Exif data.

October 9, 2009 - Another missed day

1/80f5.6ISO 20037mmRAW

Yep, I have missed another day. So in keeping with my tradition of posting a photo of myself on days that I miss, here is a shot taken by my son, Joshua, during our family's egg hunt last Easter.

Yes, I followed my little girls around with a cannon of a Canon. Besides, they're used to it!

October 8, 2009 - Football practice under stormy skies

1/60f5.0ISO 40018mmRAW

I am not too thrilled about today's photo, but here it is. I was short on time and didn't know what to do, but as I was driving home from work (after staying late again) I saw the lights on at the local park. So I stopped for about 10 minutes to see if I could get a shot of a game.

I was disappointed, however, to find out there wasn't a game — just a practice. And it hadn't even started yet. I waited for as long as I felt I could, and grabbed a few snapshots as they moved out to the field for warmups. I purposefully put the ground along the bottom of the frame to bring in the overcast, stormy looking sky.

I wish I had been able to get closer to the players. Maybe catch them in some kind of pre-practice huddle, or lined up on the grass as they stretch. But I had two things going against me. First, I didn't have any time. And second, only the players and the coaches were allowed onto the field. Everyone (and I mean everyone) was to stay on the other side of the gates. The coach seemed like a no nonsense kind of guy, and I wasn't going to push him.

Sunday, October 25, 2009

October 7, 2009 - Gorgeous sunset photo

2 secf11ISO 10018mmRAW

We just had a strong front go pushing through today and it turned into a beautiful, clear day. From past experience, I knew this would produce some strong colors at sunset, so I planned out this shot in advance.

My son and I hiked through a field with waist high grass in order to get on the other side of this massive, old oak tree. We set the camera up on a tripod to insure stability, and took a bunch of photos.

Each shot was done on 'M' so we could alter each shot slightly from the previous one. We mostly experimented in longer or shorter shutter speeds, but we also changed angles and orientations.

Sunset photos are the best when you include something in the sunset. It doesn't matter much what it is (like a silhouetted tree, your best friend, or reflections off of a surface), but its inclusion is vital.

For this shot, I put the silhouetted oak down in the lower corner to also use the rule of thirds. As for the other settings, I wanted a good, deep depth of field, so I went with f11. ISO 100 insured the photo would be smooth and grain-free, and the tripod prevented any blurriness on such a long exposure.

I liked this one the best. There was still enough light so the field wasn't thrown into complete darkness, and the clouds had a little hint of pink in them at the top of the frame. But when I loaded it up into Photoshop Elements, however, I couldn't quite get the color that I wanted. Either the sky wasn't blue enough at the top, the clouds weren't bright enough, or the horizon wasn't yellow enough. And I totally couldn't see any pink in the clouds.

So what did I do? I pulled out The Photoshop Elements 6 Book for Digital Photograhers (here's a link to the same book for the latest version of Photoshop Elements). I reviewed the book for ideas on getting the missing colors, and found the solution &mdash the 'Adjust Color Curves' tool. It's amazing! I'm going to need to use this one more. Not only did it bring out all of the color that was missing, but it also helped me keep the field from going completely black. It completely saved me from going into depression (because I was so frustrated with the lackluster look of the photo).

What do you guys think? Did I go to far? Is the color unreal? Or did I get it right?