Saturday, August 29, 2009

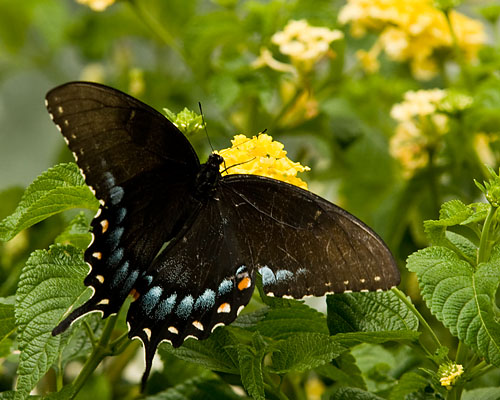
August 27, 2009 – Butterfly photo

1/320f8ISO 400200mmRAW

I had set out to do a different kind of photo, but you have to be alert for other opportunities — and that's exactly what I got today. This large butterfuly came fluttering past, and I instantly forgot everything else!

I was afraid the butterfly would be skittish, so I used my 70-200 f2.8 lens so I could zoom in close to the butterfly without physically getting too close. It hung around for about 10 minutes, but hopped from flower to flower, and I had to constantly change our shooting positions.

I shot this at f8 to get more depth of field, even though it was only about an inch. I didn't want to go any smaller on my aperture (which would give me more depth) because that would also reduce my shutter speed, and shooting at 200mm I needed to make sure the shutter speed stayed above 1/200 to help eliminate camera shake (the rule of thumb is you need to make sure your shutter speed is faster than the focal length of the shot).

I did bump up my film speed to ISO 400, however, which helped a lot (as explained in this post). Why didn't I go to ISO 800? Because at that film speed you start to get graininess added to the photo. As the camera increases the sensitivity of the image chip, the colors in the resulting photo becomes less smooth, which makes it appear grainy (like it was printed on sandpaper).

Out of the 40-50 shots I got of the butterfly, this wasn't my first choice. With the wings slightly closed, you can't completely see the symmetry in both wings. I did have one photo where the butterfly's wings were completely open, but there was one offshoot of the flowers below that blocked a tiny bit of the wings. I picked to post this shot was the best I had where there is nothing covering the butterfly.

Friday, August 28, 2009

August 26, 2009 – Sovereign building in Buckhead

1/640f5.6ISO 10027mmRAW

I know, I know . . . another building shot. But I was running out of time Wednesday for a photo and this is such an interesting building. It's called Soveriegn, and it combines commercial office space with residential and retail. There's a bank and two restaraunts on the ground floor, office space up to the 25th floor, a private club on the 26th floor (you can see the swimming pool area halfway up on the right), and condos (starting at a $1 million) up to the top.

But that's not what makes it unique. Pay attention to the outside walls of the building. They're curved, not square. They don't twist, but bend outward and then back in. At first it may seem like my shot is tilted, but if you look at the center of the building, you will see a straight line where the edge of the one of the curved corners is facing directly towards me.

I shot this at a fairly wide angle, placing the building in the top 60% of the photo. I then cropped out just the building. This really helped control the distortion that would normally happen when pointing the camera up at something tall.

I wish the clouds were a little better, however, like being smaller and more puffy. I even waited about 15 minutes for a large, darker, gray cloud to pass by, so these clouds are better than what were in the first picture.

Wednesday, August 26, 2009

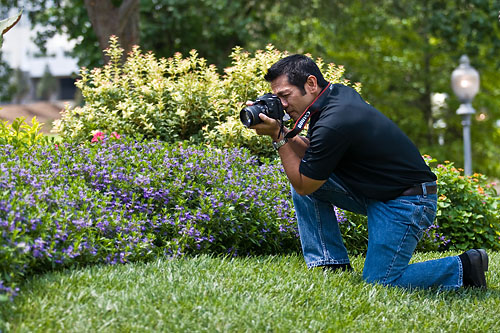
August 25, 2009 – Candid photo

1/640f2.8ISO 20090mmRAW

One of my good friends, Ramon, was inspired by the August 19 photo of the flowers and the bee, so he asked me to help him do the same thing during lunch yesterday. I tried to get some photos myself, but ultimately decided to snap a truly candid photo of Ramon as he was shooting.

By placing on the side of the photo, it lets you see what he is trying to photograph. The wide aperture (f2.8) blurs out the background, so the construction site in the upper left corner isn't distracting. Finally, the sunlight is striking the side of his body that is facing the camera, which really helps avoid his shirt and face being too dark.

Ramon is also showing good form in how he is holding his camera. He is down on one knee, supporting his upper body and camera by resting his right elbow on his knee.

By the way, I am not sure how my dates were off, but they were. Even though it may look like I have skipped a day, I haven't.

Tuesday, August 25, 2009

August 23, 2009 - Suwanee Town Center at night

1/10f5.6ISO 160020mmRAW

My wife, Rachel, has been encouraging me recently to do black and white photography, and this is my first attempt at accepting her challenge. Please let me know what you think of the shot.

I am by no means an expert on black and white photography, so I won't be offering much along the lines of tips for this kind of photography. It's something new to me, and it's always good to step out of your comfort zone and be willing to make mistakes as you learn something new. It's a great way to become a better photographer.

There was one really challenging aspect to this photo. One-tenth of a second is really slow (even for my IS lens, which helps offset camera shake at slow shutter speeds), and I didn't have a tripod. So what did I do? I braced myself to be as still as possible and then held down the shutter button to fire off several shots in succession. Out of the five shots taken, this is the middle one and it came out crystal clear. The others were all a little blurry.

I tried to frame the shot a little bit by having the solid brick wall on the left and the tall shrubbery on the right. This allows the curvature of the store fronts go three-quarters of the way into the photo, but prevents it from reaching the edge. This helps keep the viewers eye in the photo.

This was shot after 9 p.m. on a Monday night, so most of the shops were closed and few patrons were walking around. I might go back on a Friday or Saturday night and try this again with several pedestrians walking through the photo.

Monday, August 24, 2009

August 22, 2009 – Daisies in the morning sun

1/30f11ISO 10055mmRAW

I got out early Sunday to get some flower photos in the morning sun. I set my camera on a tripod and used my Canon EF-S 18-55mm f3.5-5.6 IS lens, which is also a decent macro lens.

Don't know what macro photography is? Don't worry — a lot of people don't. Simply put, macro photography is the art of taking closeup photos of small things, which allows you to see details not easily seen with the naked eye.

Using a tripod is vital for this kind of shot. As my friend Brian pointed out in one of his comments, the closer something is when you focus on it, the narrower the depth of field is. So in the instance of these daisies, they were about 10 inches from the lens. To get a deep enough depth of field, I needed to close the aperture down to f11.

I could have bumped up the ISO from 100 to 200 (which would have doubled the shutter speed from 1/30 to 1/60), but I wanted to have the cleaner image that ISO 100 would produce. Also, when you are hand-holding the camera at these short focus distances, a slight sway of a half-inch forwards or backwards can totally ruin the focus. Even at f11, you are dealing with such a narrow depth of field that a tripod is vital to hold the camera steady — not only because of the slow shutter speed, but also because you want an exact spot for the focus.

I shot this a little wide to give myself optimum flexibility when cropping the photo in Photoshop. This particular crop shows about half of the photo. I chose to crop it this way to implement the rule of thirds by putting the center of the flower a third of the way into the photo.

If you would like to try this with your camera, there are two options: most point-and-shoot cameras have a macro mode (which is usually represented by a flower icon) or, if you have a DSLR, you can buy a macro lens, which is specially designed to focus on items only a few inches away.

Point-and-shoot cameras can be great for macros since many of them will let you focus as close as two or three inches from the lens. As for DSLRs, some of the newest kit lenses (the one that might have come with your camera) will do for macros in a pinch because they also have a very short minimum focal range. For instance, the lens I used can focus to within five inches.

A couple of notes of warning, however. First, dedicated macro lenses (and point-and-shoot cameras set to macro mode) will have a focus range of only a few inches to a few feet. If you try to focus on something more than three feet away, your lens probably won't be able to. Second, this kind of work is best done under controlled circumstances. The more things that are out of your control (like wind and inconsistent sunlight), the more you will have to work. These flowers were actually in a vase, so as the sunlight moved through the trees I had to move the vase several times to keep it in the light

As for what I don't really like in the photo, there is a hot-spot nearly dead center where the detail in the yellow is lost in one petal. Also, I wish I had gotten the tips of the petals at the bottom of the photo in more focus.

Sunday, August 23, 2009

August 21, 2009 – Tennis portrait

1/400f2.8ISO 100175mmRAW

My two daughters have joined a tennis class, and couldn't be more excited. My wife, Rachel, has been asking for more photos of the kids, so I was happy to oblige. When I went to take the photo, however, I discovered a problem. There was a lot of stuff along the fence in the background that I didn't want in the photo, so I had to come up with a solution that would create a narrow field of vision.

I stood about 30 feet away from them and used a long telephoto lens (my 70-200mm f2.8L zoom lens) to focus on just them and leave out as much background as possible. I also put the camera in aperture mode (which should be an 'A' on your mode dial) and set it to 2.8. This wide aperture does a nice job in blurring out the background. So I had the best of both worlds — the long lens created a narrow field of vision that left out most of the clutter and the wide aperture made what was left (a bench) nice and blurry.

What also helped in the photo is most of the court was in the shade of some trees, so I had them stand in the shade in the middle of the court. There was plenty of ambient light coming down from the bright, open sky above them, which helped illuminate their faces and create a softer light that was void of harsh shadows.

Finally, a couple of more little tips. First, I knelt down to get the lens to their chest level. This subtle trick can really help make a difference in child photos. It also helped bring more of the fence into the background instead of the court surface. Second, I used the net as a sort of leading line into the photo. By placing my girls where they are, the net practically ends at them, which helps keep your attention in the center of the photo.

There's one huge thing I wish I would have done differently. It just seems awkward that my older daughter's hand is hanging limply in the middle of the photo. I should have asked her to hold the racket with both hands or drop her left arm down on the other side of the net. And while not as much of a problem, I probably should have had them swap sides and place the shorter one on this side of the net.