In yesterday's tip I said you should always ask for permission from the umpire before you set a foot inside the fence to take pictures. Why? The umpire is like the owner of the field. What he says goes. He has complete authority over everyone at the game, on the field and off.
What that also means is he has complete responsibility, too. If there is something dangerous going on during a game, like a toddler walking into the field of play, he is responsible if that child gets hurt. Umpires take a great deal upon their shoulders, and most of us don't realize it.
If you, as a photographer, ever get the ire of the umpire, you will likely get tossed out of the game immediately, even if all you are doing is taking photos from outside of the fence.
Try to do all you can to make sure the umpire is comfortable with you taking photos. Be professional and to the point. Introduce yourself as a photographer. Say why you are there.* Explain you understand the rules of the game. Then ask for permission to shoot inside the fence. You may want to add that you will stay far away from fair territory.
I use these guidelines all the time. I have been turned down only once, and that was at a tournament where the tournament director overturned the umpire's decision to let me in.
* I would suggest saying something other than, "I would like to get some photos of my kid." Instead, don't acknowledge you are a parent and say instead something like "The team (or some parents) have asked me to get pictures of their players." Of course, if you don't have professionally looking camera gear, like a SLR and a long telephoto lens, then expect to get turned down.
Saturday, October 13, 2007
Photo Tip: Best way to catch a catcher
Most people won't think about it, but one of the hardest positions in baseball (or softball) to photograph is the catcher. Most of the time you are watching the ball, the batter, the pitcher, or the fielders. It's easy to forget about the catcher. And when you do remember, you also have a batter and an umpire crowding the photo.
I have found the best time to get photos of the catcher is during the first inning warmups. This is when the pitcher goes out and finishes warming up his arm and throws up to a dozen pitches at game speed. There is no batter, no umpire. Just the pitcher and his catcher.
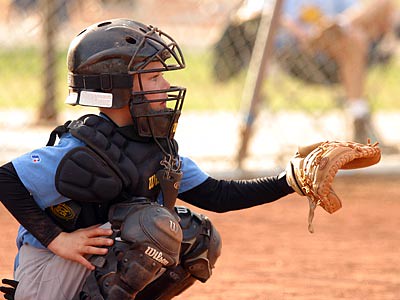
There are three specific things I look for when taking pictures of the catcher during warmups. First, I want to get close enough to get a good, tight shot of just his upper body and extended glove while he waits for a pitch. This should give a pretty good view of his face through the face mask, and isolates the photo to just him. Like this shot.
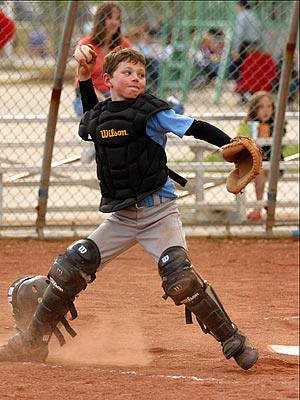
Second, I also look for a shot of him making the throw to second base, as if a runner was trying to steal. This throw is usually announced before the pitch by the catcher yelling out "Coming down!"
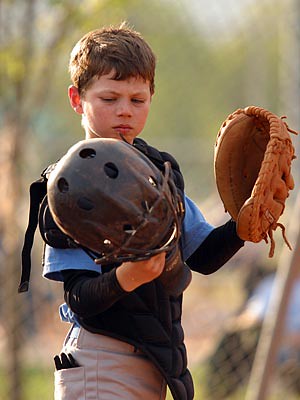
Third, I try to get any shot of him with his helmet and mask in his hand and his face exposed. These can be unpredictable and hard to catch, so be on the lookout at all times for these when shooting catchers. Mothers just love that kind of shot because it shows their favorite player in a position that definitely speaks 'catcher' but the face is easy to see, like this.
Finally, just a few more pointers about shooting catchers.
I have found the best time to get photos of the catcher is during the first inning warmups. This is when the pitcher goes out and finishes warming up his arm and throws up to a dozen pitches at game speed. There is no batter, no umpire. Just the pitcher and his catcher.
There are three specific things I look for when taking pictures of the catcher during warmups. First, I want to get close enough to get a good, tight shot of just his upper body and extended glove while he waits for a pitch. This should give a pretty good view of his face through the face mask, and isolates the photo to just him. Like this shot.
Second, I also look for a shot of him making the throw to second base, as if a runner was trying to steal. This throw is usually announced before the pitch by the catcher yelling out "Coming down!"
Third, I try to get any shot of him with his helmet and mask in his hand and his face exposed. These can be unpredictable and hard to catch, so be on the lookout at all times for these when shooting catchers. Mothers just love that kind of shot because it shows their favorite player in a position that definitely speaks 'catcher' but the face is easy to see, like this.
Finally, just a few more pointers about shooting catchers.
- Position yourself so his body opens up to you when catching and throwing. That means shoot from the first base line for a right-handed catcher, and vice-versa for a lefty.
- In youth sports, using a 70-200mm lens (or something similar) will give you enough range to shoot from the dugout area or near the coach's box. High school and higher level baseball will usually need something with more reach, like a 300mm lens.
- Get down on their level. If they are crouching, then you need to crouch. If they are standing up to make a throw, then you can stand up.
- And the most important thing is to always ask the umpires for permission to step out onto the field of play. This applies for foul territory, too! What I usually do is show up before the game starts and ask the umpires while the two teams are warming up. I will talk more about this tomorrow.
Wednesday, October 10, 2007
Photo Tip: Overcoming camera shake at low shutter speeds
In addition to everything else I do, I am also an Assistant Scoutmaster for our church's troop. Tonight we did something very special. We retired an American flag.
Our church has over 100 temples worldwide. We are fortunate to have one in Atlanta, and Troop 566 had been asked to retire its flag. As fitting for a large building, it had a large flag -- 15 feet long!
We used eight Scouts in the effort to remove the old flag and hoist its new replacement. I was asked to document the whole event with photos, which was challenging since the sun had already set and by the time we were done it was quite dark.
Near the end of the ceremony, I wanted to get a photo of the new flag rising on the flagpole with the Scouts saluting it. I didn't want to use the flash because it would light up the parking lot in front of me but not add much light to the scene I was trying to capture. However, without the flash the shutter speed was registering around 1/10th of a second -- way too slow for the typical hand-held shot. And I didn't have a tripod.
So what did I do to improvise? I used my camera's high-speed frame rate. I have a Canon 20D, which shoots at five frames a second. Standing as still as possible, I held down the shutter button and fired off 13 shots in rapid succession. When I sat down at the computer to view them, five were in focus.
This is the best one.

The shot above was taken at 1/6th of a second with the lens set at f2.8 and film speed set to ISO 400. Pretty amazing!
So why did it work? No matter how still you try to stand, your body is still going to move and sway in tiny increments. If the shutter speed is faster than 1/50th of a second, it overcomes this movement. But if it is below 1/30th of a second, then you will suffer from camera shake.
By holding down the shutter button for several frames, the camera captured several shots when I was actually motionless -- in those split second moments when my body, arms, and hands were absolutely still.
Do you have to have five frames per second to do this? No. I have successfully done it on some of my older cameras that were at 3 fps. While I haven't personally done it with a slower frame rate than that, don't be afraid to try it with your point and shoot cameras, too. There's no harm done in trying!
Monday, October 8, 2007
Photo Tip: Don't be afraid to take a lot of shots
With today's digital cameras it is easy to take a lot of photos. And I mean a lot of photos! And that is what today's tip is all about.
Don't be afraid to take a lot of shots. Whether you are having some friends pose for a picture, or you are trying to capture a candid moment, take several pictures. In fact, I would say the more candid the situation, the more shots you should get.
When you are done, don't worry about keeping them all. Just choose the best one or two and discard the rest.
Let me show you what I mean. In yesterday's photo tip I showed a photo taken at the park. I love the photo. It really captured my daughter's smile and fun-loving personality. What I didn't show you is how many attempts I took at capturing that one shot. In this instance there were 12:
When I got home I looked through them all, found the one that really stood out from the rest, and moved it into a special folder on my hard drive of the best photos of my daughter. And just because I love her so much, here it is again!

Don't be afraid to take a lot of shots. Whether you are having some friends pose for a picture, or you are trying to capture a candid moment, take several pictures. In fact, I would say the more candid the situation, the more shots you should get.
When you are done, don't worry about keeping them all. Just choose the best one or two and discard the rest.
Let me show you what I mean. In yesterday's photo tip I showed a photo taken at the park. I love the photo. It really captured my daughter's smile and fun-loving personality. What I didn't show you is how many attempts I took at capturing that one shot. In this instance there were 12:
 |  |  |
 |  |  |
 |  |  |
 |  |  |
When I got home I looked through them all, found the one that really stood out from the rest, and moved it into a special folder on my hard drive of the best photos of my daughter. And just because I love her so much, here it is again!
Sunday, October 7, 2007
Photo Tip: Clean up your backgrounds
One of the great things about being a parent is finding your kids doing something especially cute. Often, our first reaction is to grab the camera and try to capture the moment.
Today, I have two tips for you along those lines. First, and most important, is to take the shot as quickly as possible. Sometimes trying to get the perfect angle or composition will cause you to miss the moment. So don't hesitate to capture a couple of shots right away.
Second, pay attention to your background and other things that might be cluttering up the picture. Look for stuff that will distract the viewer's eye from the real focus of the photo -- things like toys lying on the floor, people walking around, bright objects, etc.
See if you can change your position to get a less-distracting background, or pick up items that don't need to be in the photo. Maybe a different perspective will remove some of the problems, too, like crouching down to take the shot.
Look at this photo of my daughter coloring. What is the first thing you notice?

Did you see the dolls? Or the bright yellow toy bin? Maybe the chairs in the background?
There's an awful lot to distract the eye in that photo! Chances are the first thing you saw was something other than my daughter coloring.
For a better photo, I took the dolls off of the table, moved the rocking chair on the right out of the way, and then moved the container of crayons from the left side of the table to the right. Finally, I changed my camera angle by squatting a little and moving to the left.
Here is the resulting photo.

Much better, isn't it? By changing my perspective, I made the background a blank wall. Now the photo has only the subject and what she is doing. There isn't anything to distract you from what I wanted to capture in the photo.
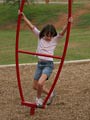
Here's another photo taken in a more real-world situation. I had taken my kids to a local park and my daughter was having a blast on some of the playground equipment. I set up to take the shot where there wasn't anything in the background. I purposefully left out the rest of the playground, the kids, and anything else that would divert the eye.

So to recap, when taking a photo many times what you leave out is just as important as what you leave in. And if it's one of those spur-of-the-moment photos, remember to take a couple of shots immediately (so you will at least have something) and then look for how you can improve the photo.
Today, I have two tips for you along those lines. First, and most important, is to take the shot as quickly as possible. Sometimes trying to get the perfect angle or composition will cause you to miss the moment. So don't hesitate to capture a couple of shots right away.
Second, pay attention to your background and other things that might be cluttering up the picture. Look for stuff that will distract the viewer's eye from the real focus of the photo -- things like toys lying on the floor, people walking around, bright objects, etc.
See if you can change your position to get a less-distracting background, or pick up items that don't need to be in the photo. Maybe a different perspective will remove some of the problems, too, like crouching down to take the shot.
Look at this photo of my daughter coloring. What is the first thing you notice?

Did you see the dolls? Or the bright yellow toy bin? Maybe the chairs in the background?
There's an awful lot to distract the eye in that photo! Chances are the first thing you saw was something other than my daughter coloring.
For a better photo, I took the dolls off of the table, moved the rocking chair on the right out of the way, and then moved the container of crayons from the left side of the table to the right. Finally, I changed my camera angle by squatting a little and moving to the left.
Here is the resulting photo.

Much better, isn't it? By changing my perspective, I made the background a blank wall. Now the photo has only the subject and what she is doing. There isn't anything to distract you from what I wanted to capture in the photo.
Here's another photo taken in a more real-world situation. I had taken my kids to a local park and my daughter was having a blast on some of the playground equipment. I set up to take the shot where there wasn't anything in the background. I purposefully left out the rest of the playground, the kids, and anything else that would divert the eye.

So to recap, when taking a photo many times what you leave out is just as important as what you leave in. And if it's one of those spur-of-the-moment photos, remember to take a couple of shots immediately (so you will at least have something) and then look for how you can improve the photo.
Subscribe to:
Comments (Atom)