Saturday, August 22, 2009

RAW versus JPEG

In my last posting, Sheree asked what RAW is and how you can get your camera to use RAW instead of JPEG. Instead of answering in the comment section, I decided to make a new post on the matter.

RAW is the true image data captured by your camera's image ship. If you shoot in JPEG mode (which most camera's do automatically), you are compressing the image data down into the JPEG format.

A lot of point-and-shoot cameras don't give you the option to shoot RAW, and if you have a camera that does then you need software on your computer that can read the RAW data.

Fortunately, Photoshop Elements has a very good RAW editor. It's what I use most of the time. If you don't have Photoshop, then your camera may have come with RAW editing software.

RAW takes a little getting used to because the files are larger and they take your computer a few seconds longer to upload and process. But you have more options and get better results when working with a RAW file.

For a better explanation of what RAW is, how it can make your photos better, and some of the drawbacks of shooting RAW, see this article that I wrote about the subject.

As for how to get your camera to shoot RAW, you will have to refer to that dreaded manual that came with your camera. You know, that little booklet you have never really looked at, even though you probably have a little voice in the back of your head that keeps saying you should.

Friday, August 21, 2009

August 20, 2009 – Party on the deck

1/125f11ISO 20018mmJPEG

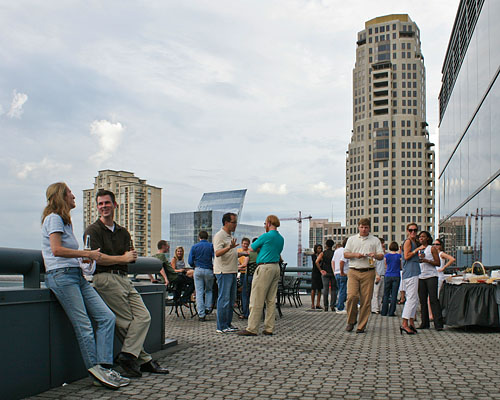
Our company (HowStuffWorks.com) just launched the first portion of our social networking platform, so we had a party out on the deck (15 floors up) to celebrate. The weather was nice, but really overcast.

I wanted to get a photo that would capture how beautiful the view of the other buildings can be, but also capture the fun everyone was having. That was hard, and here is what I thought was my bast effort.

I shot this at a small aperture (f11) in order to get the people in front (who were about 18 feet away) in focus along with all of the buildings in the back. I might have been able to use a wider aperture, but they were laughing and I didn't have much time to react. So I went with an aperture I knew would do the job.

I used Photoshop Elements to correct most of the distortion from the wide angle shot. I also cropped the photo in a way to leave out the large trash can that was by the table of food on the right.

There were a couple of things I think that could have made this photo better. First, I should have shot it in RAW mode for more post-processing control over the exposure, contrast, and color. But alas, I had left it in JPEG mode after shooting the bees the day before. Second, I wish there were another couple of people talking in the empty space where you can see the tower crane. Ideally, I would have liked them to have been 15-20 feet from the camera.

August 19, 2009 – Flowers and Bees

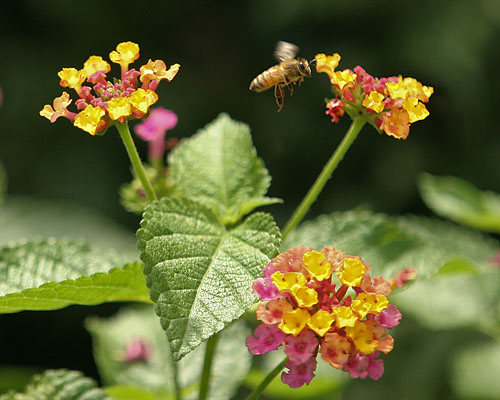
1/2500f2.8ISO 400150mmJPEG

I really work in a beautiful area. It's in the heart of Buckhead, a thriving live-work-and-play area of northern Atlanta. It is dominated by high rise hotels, office buildings, and condominiums. But despite all the concrete and steel, they have done a good job of preserving some green space, too.

I shot this honeybee among a large swath of flowers about 100 yards from my building. I used my 70-200 f2.8L lens to get a clear, sharp, and fast photo. The day was mostly cloudy and the sun was ducking in and out from behind clouds quite a bit. So I left the lens wide open and used ISO 400 to get a fast enough shutter speed for when the sun was blocked.

This shot was in the full sunlight, so it resulted in a really fast shutter speed. But it wasn't fast enough to stop the bee's wings. The blur really drives home that the bee is hovering over the tiny flowers.

This kind of shot is a lot of hard work, but the reward can be great. I shot about 300 photos in 30 minutes, trying to get just two or three like this one, where the bee is actually flying between flowers. You will probably agree, a photo of a bee flying will beat a one of a bee walking any day.

I had to shoot these as JPEGs instead of RAW because my camera will shoot 20 JPEGs in succession, but only 8 RAW images. I would start shooting when I thought the bee might jump off of the flowers and fly to the next batch. If I misjudged (and I did a lot), I would wait for my camera's memory buffer to empty and then shoot a bunch more.

Wednesday, August 19, 2009

August 18, 2009 – Breakfast for dinner

1/50f5.6ISO 80050mmRAW

We decided to have a simple dinner tonight, so we whipped up some pancakes. They were absolutely scrumptious – thanks, Rachel! – so I wanted to share them with you.

I shot this with my 50mm f1.8 lens, which is really sharp. By pumping up the ISO, I could close the aperture a little to get more depth of field (but not too much). This also allowed me to handhold the camera without risking camera shake. I shot RAW so I could tweak the color to the golden hue I wanted.

The color was harder than I thought it would be to get it just right. I can see why commercial food photographers use strobes and flashes because the natural lighting was too mixed up for me to easily find the right color.

Monday, August 17, 2009

August 17, 2009 – Suwanee City Hall

1/250f8.0ISO 20035mmRAW

I was driving home from a canceled Boy Scout training session and I noticed the beautiful bank of clouds being lit up by the early evening sun. It's the kind of setting where you want to find something nice to put in front of it, so I thought of the recently finished Suwanee City Hall.

As I was parking, I looked for where I thought would be the best perspective. I also noticed that the sun was dangerously close to going behind some clouds, so I knew I didn't have much time. I literally ran to a spot that, while not my choice for the best location, would let me get a good shot as soon as possible. I then went to the spot I had picked out initially and got some more photos.

When I got back home and looked at all of the shots, the first one turned out to have the best combination of clouds, color, and composition. It reminded me of something I read about how Ansel Adams got his Moonrise photo.

He was traveling down the highway when he noticed the moon rising over the mountain and the village in the evening light. He slammed on the brakes, pulled over, and hopped out with his gear. He feared there wasn't enough time to measure the light and determine the proper exposure, so he made his best guess and took the photo. Then he went through his normal process to take a photo, but before he was done the light was gone.

Adams probably drove away thinking he had missed a perfect opportunity for a wonderful photo, but we all know now that he didn't. One of his most famous photographs was a guess – a well-educated guess, mind you – but a guess all the same.

The main lesson to learn here is to pay attention to your surroundings and don't be afraid to snap off a quick shot at something that looks great. You never know when that moment may be the only chance you've got. Then take the time to make sure you have everything set for a great photo.

I shot this at f8 to get a really sharp photo, and then focused about two-thirds into the scene (around the water fountain in the front) to make sure everything was in focus, from front to back. I also shot it a little loose so I could crop it in the way I wanted once I got it loaded on the computer. Finally, I followed the rule of thirds by putting the building down in the lower third of the photo, which helps place more emphasis on the cloud formation above it.

In order to avoid a slanted effect (where the sides of the building seem to slant towards each other), I purposefully went up the slope in front of the building in order to be standing more on an equal elevation. You can see the camera level is just above the awning over the front doors. This way I was aiming the camera straight ahead instead of aiming it slightly upwards, which would have created the slanting sides of the building.

I really like this photo. Some of the impact is lost here in the small version, but the full-blown shot is fantastic. The only regret I have is something out of my control. I wish the clouds were more puffy and separated, instead of one massive cloudbank.
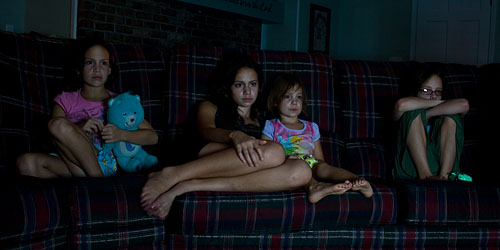
August 16, 2009 – Movie night

4 secf4.0ISO 20025mmRAW

Last night the girls were crowded around the TV watching Coraline, a claymation movie that reminded me a lot of Tim Burton's The Nightmare Before Christmas. Thanks to the spooky nature of the film, my youngest snuggled up to her older sister, and my next youngest grabbed one of her favorite stuffed animals, Bedtime Bear.

I turned out all of the lights and set up the camera on a tripod right beside the TV. I took a bunch of shots (since the TV was putting out varying amounts of light, depending on what was being shown in the movie) in order to find a few goods one where the kids didn't move.

I used a low ISO to avoid noise/grainyness, and purposefully picked a shot that was a little underexposed to reinforce the idea of watching a movie in the dark. Finally, I cropped it to a wide 2 to 1 ratio to emphasize the kids and eliminate most of the distracting background.

In all, I like the photo. But others may think it could have been better if all the girls were sitting side by side. I wasn't going to pose them, however, because I wanted to capture more of their natural tendencies. Some may wonder why my 9-year-old is sitting off by herself on the right. To me, it fits here independent personality perfectly.

Saturday, August 15, 2009

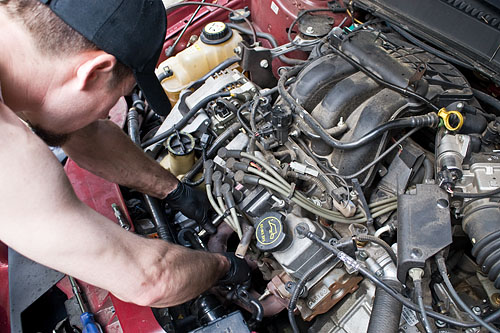
Car repairs

1/100f4.5ISO 40021mmRAW

A friend came over yesterday to fix my air conditioner. By the time I thought of taking some photos, he was wrapping up and putting everything back together.

It was a cloudy morning, so I shot this without a flash because the diffused light was doing a great job to evenly illumniate the shot. I wanted the photo to instantly convey "engine repair," so I got in real close and shot at a wide angle. This left only the engine compartment and the mechanic in the photo.

This would make a good stock photo, except for possibly one thing. The dip stick shaft is laying across the top of the engine in the top right corner of the photo. It's something that most people wouldn't notice, but once seen it might have the tendency for the viewer to wonder why it's there. I should have removed it before taking the photo.

And in case you are now wondering, here's what happened. In order to pull out my broken air compressor, he had to squeeze it past the dip stick shaft. The shaft snapped under the pressure.

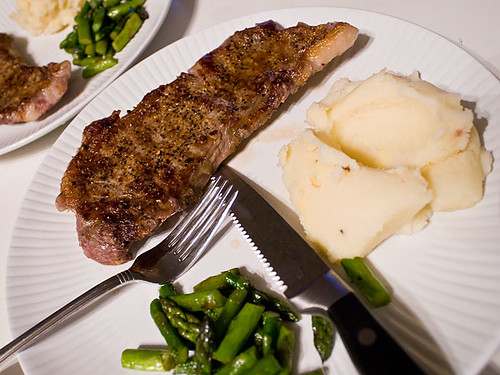
Dinner date at home

1/15f4.5ISO 80018mmRAW

My wife and I had a dinner date at home, after the kids went to bed. We grilled up some New York Strip steak, along with some loaded baked potatoes and asparagus.

I shot this with my 18-55mm IS lens, which allowed to go handheld without a flash -- even with such a slow shutter speed. Even with the IS lens, I made sure to hold my elbows in close to my chest, control my breathing, and just squeeze the shutter.

Shooting RAW helped me with the color cast from the indoor lamps. The wide f4.5 aperture helped put the background plate nicely out of focus.

In hindsight, I wish I would have turned the plate so the steak was place in the 12 o'clock to 4 o'clock position (instead of the 8 o'clock to 12 o'clock position it is currently in. This would have made the steak larger in the image instead of the potatoes.

Starting a 365 photo project!

I have really neglected this blog, but have been struggling to figure out what can motivate me to start posting again.

I think I have hit on it. I am going to start a "365" project, where I post one photo that I have taken the previous day. I will also explain what I did to get that photo.

Friday, March 21, 2008

Software Tip: Printing and Dots Per Inch

I had a friend ask a question about printing his digital photos. I thought it would be good to bring the same ideas to you.

Digital photos are made up of tiny little squares of solid color called pixels. This is where the term megapixel comes from, which is a measurement of how many millions of pixels a camera captures in each shot. The more pixels you have in an image, the more detail the image will show.

Therefore, when you go to print your photos, you want to have a lot of pixels packed into the image. The way we refer to how many pixels there are is by pixels per inch (ppi, which is the same as dots per inch).

My basic rule of thumb is if you don't have at least 200 ppi in your photo, you will likely see jagged little edges along the lines in your print. If you want something that will be "picture perfect," then you need at least 300 ppi.

"But wait a minute," you might be thinking, "my camera only said how many megapixels it shoots, not how many pixels per inch the photos will have!" You're right — the amount of ppi is up to you when you go to print a photo.

Let me give you a real-world example. On my Canon 20D I have three different sizes I can select for my photos: large, medium, small. Here are how they differ in megapixels and dimensions (in pixels):

SettingDimensionsMegapixels
Large3504 x 23368.2 MP
Medium2544 x 16964.3 MP
Small1728 x 11522.0 MP


This says that at 200 ppi, the largest I prints I could realistic get from each of the sizes are as follows:

SettingDimensionsLargest Print @ 200ppi
Large3504 x 233611.7" x 17.5"
Medium2544 x 16968.5" x 12.7"
Small1728 x 11525.8" x 8.6"


So in other words, you can print a 11x14 from the large, 8x10 from the medium, and 5x7 from the small setting. Trying to print a 11x14 from the small will result in an image that seems "blocky" and won't look good, but printing a 5x7 from the large will look beautiful and full of detail.

My next post will talk about using the crop tool in your favorite photo editor and how you can crop out a portion of your photo but still make sure it has enough resolution to print well.

Monday, March 17, 2008

Photo Tip: Window Light Portraits

I know it's been a long time since my last post, and I apologize. I hope the simpleness and impact of this tip will make up for it.

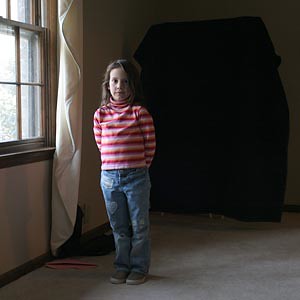
Please take a look at my wonderful daughter below:


What a wonderful photo! But if it is simple to do, then what's the secret? All I did was find a window in the house that faces north and place a dark backdrop away from it.

During this time of the year the sunlight will never shine through a north-facing window. But the light sure does, and it creates a wonderful ambient lighting effect.

To maximize this effect, I took a dark quilt and draped it several feet behind her. Here's a shot showing how the window and black backdrop relate spatially to each other:


Because the light hitting my daughter's face is several stops brighter (or, in other words, several times brighter) than the backdrop, the backdrop becomes completely black. And because of the ambient lighting coming through the window, it creates soft shadows as it wraps around her face.

You can do this shot with any kind of camera that has a zoom lens. Just stand several feet from your subject and zoom in. This will isolate him or her against the backdrop and you won't see anything else in the background.

Try it yourself and you will see how easy it is!

Tuesday, November 20, 2007

Photo Tip: Catching the basketball dribble

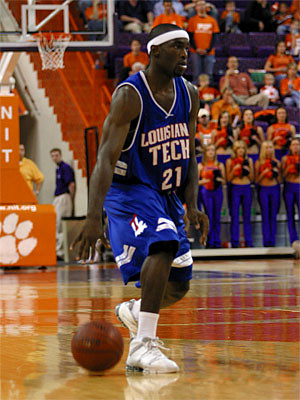
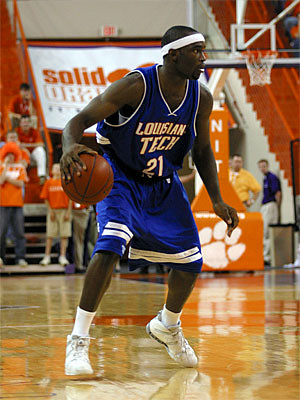
Time for quick basketball tip. When shooting basketball, it is very important to capture the basketball in the player's hand, especially when the player is dribbling the ball. Consider the following photos:


Which one is better? Obviously the second! The player looks more in control, ready for action, and seems to be starting his move. In the other photo, which was taking immediately after the second, doesn't have the same 'feel' to it. The player doesn't look like he has control of the ball and the overall feel is rather akward.

If you have a SLR camera with a quick motor drive (by quick I mean 3 frames per second or faster), you can just hold the shutter button down and fire away while your player is dribbling the ball. This should get you at least one good shot.

If you have a slow motor drive (or a point and shoot camera), there are two things I would suggest. First, concentrate on getting a photo while your player is holding the ball with both hands. This often happens when inbounding the ball, looking to make a pass, or about to shoot.

The other is to try timing the shot when he or she is dribbling. This is much harder to do, however, and requires timing and practice. You have to press the shutter button before the ball reaches their hand. How much before depends on the particular amount of lag your camera has between pushing the button and capturing the picture. SLRs have a short lag, while point and shoots (especially digitals) can have a lag nearly up to a second.

Tomorrow I will talk about pre-focusing to help those who have a long lag.

Tuesday, November 6, 2007

Basic Photo Tip: Stopping Action and Motion Blur

In photography, you usually want to stop all of the action in a photo and remove any motion blur. But sometimes you don’t. Deciding on which is often determined by what your overall goal is in taking the photo.

Do you want to capture the moment of joy when a football player crosses the goal line? Then stopping the action is likely what you want. But what if you shooting a NASCAR race? Stopping all action, including the spinning wheels, will make it look like the cars are just sitting on the track. In that instance, you probably want a little motion blur to convey the feeling of how fast they are moving.

Let’s talk about stopping the action first. There are a couple of basic rules to remember. First, for normal photography (things like portraits, landscapes, and candid photos), take the length of your lens and put it under a one. In other words, if you are shooting with a 50mm normal lens, then you need to have 1/50 of a second to expect a sharp, clear photo.

Lens LengthShutter Speed
30mm1/30
50mm1/50
200mm1/200
500mm1/500

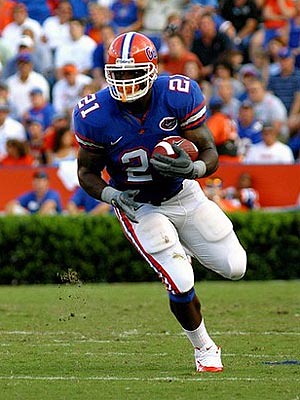
If you are trying to capture a subject in motion, however, you need a faster shutter speed. This is especially true for sports, as shown in this football photo.


The rule of thumb is the same, but you have to triple the length of your lens to expect a sharp, clear photo.

Lens LengthShutter Speed
30mm1/90
50mm1/150
200mm1/600
500mm1/1500

Let’s go back to the NASCAR example. How do you create the motion blur to help a car look like it is moving? By panning. Panning is the act of moving the camera in the direction the subject is moving while taking the photo.

Let’s say you’re at a race and the cars are going past you from the right to the left. In panning, you need to focus on the zone the car is about to go through and as the car drives through that zone you follow it with your camera, keeping it in the viewfinder the whole time. Panning also requires you to slow your shutter speed down a little bit from normal sports photography. As a rule of thumb, try the one over your lens’ length as a starting point and then adjust as necessary.

There is definitely a trick to panning, and it generally takes a lot of practice to get it down. Here is a good example of panning from a road race:


Do you see how the blurred background and blurred wheels on the car help make it seem like the car is going really fast? When you get it right, panning can be fantastic!

Basic Photo Tip: Angle of view and depth

Almost everyone who owns a camera has a zoom lens, whether it is on a point-and-shoot camera or they have one for their SLR. But what exactly happens when you zoom in or zoom out with your lens? Why does your subject get closer or further away? Angle of view is the term for how the camera shows a wider or narrower angle.

It is a difficult subject to understand. Personally, I don't completely understand it myself. But I do know that if I zoom in on a subject the angle of view narrows significantly, while if I zoom out the angle of view widens.

There are three web pages that I would recommend to see the differences in angle of view and get a better understanding. The first is the Wikipedia entry on Angle of View, particularly the section on lens types and effects.

The second is a cool page that lets you click on the various types of lenses from Canon and see the differences in angle of view. You can also click on the different Canon SLR cameras and see how the camera's digital sensor size affects the view.

The third is from Canon itself and it is a little program that lets see all of this simulated in one picture. It starts from a 15mm fisheye to a 1200mm super-telephoto lens.

There's one more important factor to consider when using lenses. Zooming in on a subject also narrows the depth of field, while zooming out increases it. Depth of field refers to the portion of the photo that is in focus. The other factor that affects depth of field is what aperture you have your lens set to.

Although this is on a small scale in a closeup photo, here is a good example of depth of field.