In the vast majority of photos, if you took all of the colors in the photo (when properly exposed) and swirled them all together, it would come out as a medium grey. They call this 18% grey. The light meter in your camera is designed to expose your photos to match 18% grey.
Most of the time this works with fantastic results. It is simply amazing that such a basic idea works out 80% of the time. However, there are a few instances when 18% grey won't work.
If you have an overly bright photo, like kids playing in the snow, your shot will likely have grey-colored snow. If the photo is overly dark, like a close-up of three Oakland Raiders in their black home uniforms, your shot will likely have grey uniforms and overexposed faces. The 18% grey is the culprit in both situations.
You can get past this problem by using the exposure compensation setting on your camera. Most cameras have it, even point-and-shoots. It allows you to add or subtract exposure from your shot.
By adding in one to two stops* of extra exposure in your shot of snow, everything should turn out looking bright and white. Similarly, by subtracting one to two stops of exposure in the close-up of the Raiders players, the uniforms should be brought down to their usual black.
You may need to experiment a little with what works best in each of your photo taking situations. Just don’t forget to dial that exposure compensation back to zero when you are done, or you will likely regret it the next time you pull out your camera!
*for information about what a stop is, see the lesson on aperture and ISO speeds.
Tuesday, November 6, 2007
Thursday, November 1, 2007
Product Review: Picaboo software and service
My wife has just gotten into digital scrapbooking, and while researching software to use we found a free package called Picaboo. It has really intrigued me. Picaboo is more than just a program, it's also a publishing service.
Here's how it works. You can download the Picaboo software for free, design your photo books and cards, and then upload them to the Picaboo servive for printing and delivery.
I have downloaded the software for a try out. The software is easy to use, and I'm in the midst of creating a photo book of my kid's experience on the swim team last summer. When I am done, I will get it printed from the Picaboo service. Then I will let you know how the book turned out, what I thought of the software, and my overall opinion.
If you don't want to wait, you can check out the software for yourself at www.picaboo.com.
Here's how it works. You can download the Picaboo software for free, design your photo books and cards, and then upload them to the Picaboo servive for printing and delivery.
I have downloaded the software for a try out. The software is easy to use, and I'm in the midst of creating a photo book of my kid's experience on the swim team last summer. When I am done, I will get it printed from the Picaboo service. Then I will let you know how the book turned out, what I thought of the software, and my overall opinion.
If you don't want to wait, you can check out the software for yourself at www.picaboo.com.


Tuesday, October 30, 2007
Photo Tip: Using a fill flash
One of my friends got a thrill of a lifetime today -- he got to walk on a tower crane 54 stories up!
Next to our building in the Buckhead area of Atlanta is a 50-story skyscraper in the midst of construction. The HowStuffWorks team was invited to go to the top of the building and video tape some of the construction and views as they laid the 50th floor with cement.
On the way to the top, they stopped to get a photo with a backdrop of downtown Atlanta. The first photo didn't turn out so well because it was bright in the background, but not so bright in the foreground.
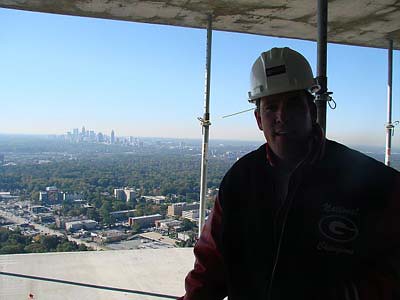
Because of the bright background, the camera was fooled into thinking it didn't need to use the flash. For the second shot, the flash was used to fill in the dark foreground.

Much better! Even though it was plenty bright to see on the open floor of the skyscraper, there was too much difference in light between the background and the foreground to get a good exposure for both.
In photography, we call the measurements of light 'stops'. If the foreground was half as dark as the background, then that is one stop. In this case, the background was more than four times brighter than the foreground.
How do I know? Because the vast majority of digital cameras can't capture more than four stops of light in the same exposure. That is why the foreground was too dark when the background was properly exposed. By using the flash, we evened out the differences between the foreground and background.
Thanks, Scott, for letting me use your photos!
Next to our building in the Buckhead area of Atlanta is a 50-story skyscraper in the midst of construction. The HowStuffWorks team was invited to go to the top of the building and video tape some of the construction and views as they laid the 50th floor with cement.
On the way to the top, they stopped to get a photo with a backdrop of downtown Atlanta. The first photo didn't turn out so well because it was bright in the background, but not so bright in the foreground.
Because of the bright background, the camera was fooled into thinking it didn't need to use the flash. For the second shot, the flash was used to fill in the dark foreground.
Much better! Even though it was plenty bright to see on the open floor of the skyscraper, there was too much difference in light between the background and the foreground to get a good exposure for both.
In photography, we call the measurements of light 'stops'. If the foreground was half as dark as the background, then that is one stop. In this case, the background was more than four times brighter than the foreground.
How do I know? Because the vast majority of digital cameras can't capture more than four stops of light in the same exposure. That is why the foreground was too dark when the background was properly exposed. By using the flash, we evened out the differences between the foreground and background.
Thanks, Scott, for letting me use your photos!
Saturday, October 27, 2007
Photo Tip: How to shoot a ghost
Just in time for Halloween, here's tip sure to fire up the kids. Turn them into ghosts!
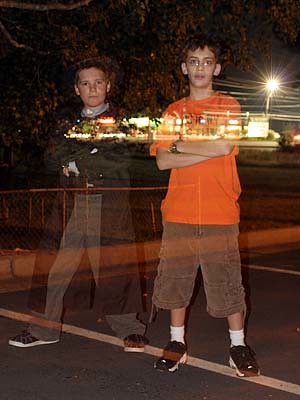
Here's how I did it, in general terms. I put the camera on a tripod and set it so it would properly expose the shot without the flash, but had the flash fire anyway. As soon as the flash fired, the kids walked out of the picture. The flash illuminated the kids, and the rest of the scene was illuminated with the natural lighting through a long exposure.
Now for the specifics. With the camera on a tripod, I set the film speed to the lowest setting (ISO 100 for my Canon 20D). Then I put the camera in manual mode and set it to 3.2 seconds for the shutter speed and f5.6 for the aperture. You may need to play around with the aperture and shutter speeds to see what works best for your situation -- f5.6, ISO 100, and 3.2 seconds worked for my lighting situation, but may not for you.
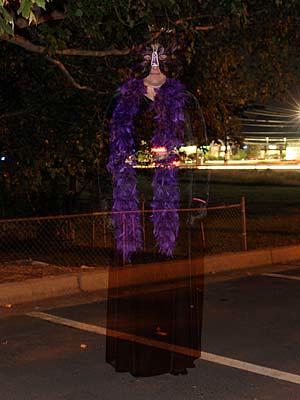
I was taking the photos in our church's parking lot after a Halloween Party. They posed under an oak tree, which helped shade the light from the parking lot lights. I positioned the kids where the illuminated signs were directly behind them.
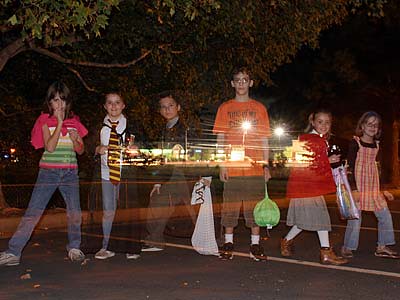
You need to do something similar. Find a dark place without much light (but enough to see). Figure out how long the exposure needs to be. The idea works better with dark clothing instead of light (light-colored clothing will possibly streak as the subject walks away). Finally, have something bright or light-colored behind the subjects so it will easily shine through their bodies, creating the illusion that they are ghosts.
Be prepared to experiment some to find what works best. And most of all, have some fun!
Here's how I did it, in general terms. I put the camera on a tripod and set it so it would properly expose the shot without the flash, but had the flash fire anyway. As soon as the flash fired, the kids walked out of the picture. The flash illuminated the kids, and the rest of the scene was illuminated with the natural lighting through a long exposure.
Now for the specifics. With the camera on a tripod, I set the film speed to the lowest setting (ISO 100 for my Canon 20D). Then I put the camera in manual mode and set it to 3.2 seconds for the shutter speed and f5.6 for the aperture. You may need to play around with the aperture and shutter speeds to see what works best for your situation -- f5.6, ISO 100, and 3.2 seconds worked for my lighting situation, but may not for you.
I was taking the photos in our church's parking lot after a Halloween Party. They posed under an oak tree, which helped shade the light from the parking lot lights. I positioned the kids where the illuminated signs were directly behind them.
You need to do something similar. Find a dark place without much light (but enough to see). Figure out how long the exposure needs to be. The idea works better with dark clothing instead of light (light-colored clothing will possibly streak as the subject walks away). Finally, have something bright or light-colored behind the subjects so it will easily shine through their bodies, creating the illusion that they are ghosts.
Be prepared to experiment some to find what works best. And most of all, have some fun!
Friday, October 26, 2007
Photo Tip: Protect your camera with a camera bag
The most practical tip I can give is something many people don't think about. Protect your camera! There is no better way to do this than putting your camera into a camera bag. It will help protect your camera from being bumped, dropped, or even scratched with keys and coins while inside your pocket or your purse.
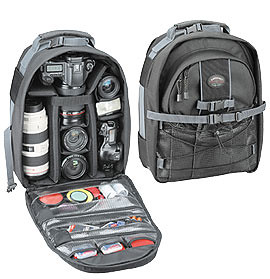 I personally use the Tamrac 5375 Photo Backpack. It is rugged, padded, and has plenty of storage for two cameras, a flash, and four lenses. I can also pack it with two spare camera batteries, eight spare flash batteries, several memory cards, and a bunch of odds and ends.
But most of you have just a point-and-shoot camera and don't need all of that room and versatility. While my bag cost over $100, a small camera bag for a point-and-shoot should cost only $10 to $20 and there are a wide variety from which to choose.
One word of caution, however. Camera bags have a tendency to announce to potential thieves that you are carrying a camera, especially if the bag has something like Canon or Nikon printed on it (like many do). Be extra careful and don't leave your camera bag unattended.
But you can use something else to put your point-and-shoot cameras in. I suggest a baby bottle bag! Something like one of these will do wonderfully:
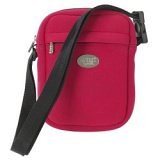
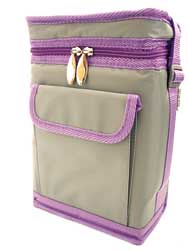
In a baby bottle bag you have plenty of room for a camera, spare batteries, and an extra memory card. You will also have enough room for something like a lens cloth and cleaning solution or a bean bag (which makes a great improvised camera stand). Best of all, because the bag says something other than Canon or Nikon, who would want to take it? No one wants to steal a baby's bottle!
I personally use the Tamrac 5375 Photo Backpack. It is rugged, padded, and has plenty of storage for two cameras, a flash, and four lenses. I can also pack it with two spare camera batteries, eight spare flash batteries, several memory cards, and a bunch of odds and ends.But most of you have just a point-and-shoot camera and don't need all of that room and versatility. While my bag cost over $100, a small camera bag for a point-and-shoot should cost only $10 to $20 and there are a wide variety from which to choose.
One word of caution, however. Camera bags have a tendency to announce to potential thieves that you are carrying a camera, especially if the bag has something like Canon or Nikon printed on it (like many do). Be extra careful and don't leave your camera bag unattended.
But you can use something else to put your point-and-shoot cameras in. I suggest a baby bottle bag! Something like one of these will do wonderfully:
In a baby bottle bag you have plenty of room for a camera, spare batteries, and an extra memory card. You will also have enough room for something like a lens cloth and cleaning solution or a bean bag (which makes a great improvised camera stand). Best of all, because the bag says something other than Canon or Nikon, who would want to take it? No one wants to steal a baby's bottle!
Wednesday, October 24, 2007
Photo Tip: Block out the sun!
In my last tip, I showed a bunch of Scouters trying to determine where we were on a topographical map. I had laid down on the ground for a different perspective, positioning myself on the side of the group that offered the best viewing angle of their faces. The problem was I was shooting directly into the sun!
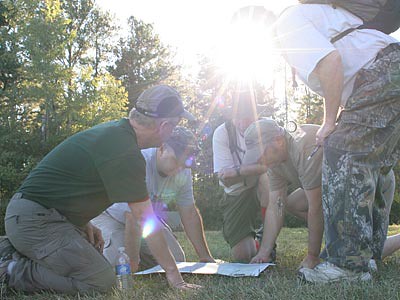
So what did I do? I moved slightly until the sun was being blocked by one of the subjects. Because of how late it was in the afternoon, there was plenty of light coming from the rest of the sky. What resulted was a pleasantly illuminated photo.
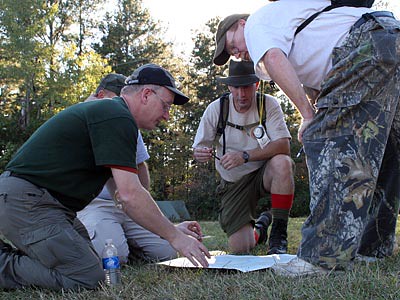
So don't be worried about shooting directly into the sun -- just use something that will block it's intense light. If the subjects you are shooting are in deep shadow because the sun is behind them, which often happens in the middle part of the day, then use your flash to lighten them up. Most point and shoot cameras have a button that will force your flash to fire no matter what. Just use that to make the flash fire in bright daylight.
However, there are times when sunlight into the lens (or at least striking the lens even if it isn't in the shot) can add spectacular effects. Don't be afraid to experiment and see what happens. Just be careful not to look into the sun directly through the lens, especially with a telephoto lens. It can cause eye damage!
So what did I do? I moved slightly until the sun was being blocked by one of the subjects. Because of how late it was in the afternoon, there was plenty of light coming from the rest of the sky. What resulted was a pleasantly illuminated photo.
So don't be worried about shooting directly into the sun -- just use something that will block it's intense light. If the subjects you are shooting are in deep shadow because the sun is behind them, which often happens in the middle part of the day, then use your flash to lighten them up. Most point and shoot cameras have a button that will force your flash to fire no matter what. Just use that to make the flash fire in bright daylight.
However, there are times when sunlight into the lens (or at least striking the lens even if it isn't in the shot) can add spectacular effects. Don't be afraid to experiment and see what happens. Just be careful not to look into the sun directly through the lens, especially with a telephoto lens. It can cause eye damage!
Sunday, October 21, 2007
Photo Tip: Change your perspective
I have been very busy at work, and I apologize for not having a tip of the day for the past several days. However, this weekend I participated in Outdoor Leadership Training for the Boy Scouts of America and I got a ton of photos.
One of the training classes we participated in was Orienteering. After receiving our instructions, we had a challenge to take a topography map and determine the exact location of the tent we were at.
With the map on the ground, we took our compasses and tried to determine exactly where we were. I took several photos of my patrol trying to figure it out. Some were from the typical standing position, looking over shoulders. Here is probably the best one:
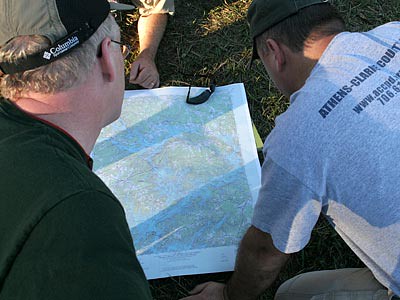
This shows the map, but there are no faces and the text on the back of the gray shirt is very distracting. Overall, I didn't like it as much.
I also took several shots from a ground-level angle. I literally laid on the ground on my side and shot with the camera a few inches off of the ground, and I like these more. You can see their faces clearly, there is no distracting wording, and with a caption you will know they are interacting with a map with their compasses.
When taking a shot, try to think of different angles and perspectives to capture the moment. Experiment with several ideas, even if you think it won't be comfortable or easy to do. Laying on the ground wasn't comfortable and surely wasn't easy to change my position when I needed to, but I think most would agree it resulted in a better shot. When you're all done, you can sit down and throw away the ones that didn't work.
One of the training classes we participated in was Orienteering. After receiving our instructions, we had a challenge to take a topography map and determine the exact location of the tent we were at.
With the map on the ground, we took our compasses and tried to determine exactly where we were. I took several photos of my patrol trying to figure it out. Some were from the typical standing position, looking over shoulders. Here is probably the best one:
This shows the map, but there are no faces and the text on the back of the gray shirt is very distracting. Overall, I didn't like it as much.
I also took several shots from a ground-level angle. I literally laid on the ground on my side and shot with the camera a few inches off of the ground, and I like these more. You can see their faces clearly, there is no distracting wording, and with a caption you will know they are interacting with a map with their compasses.
When taking a shot, try to think of different angles and perspectives to capture the moment. Experiment with several ideas, even if you think it won't be comfortable or easy to do. Laying on the ground wasn't comfortable and surely wasn't easy to change my position when I needed to, but I think most would agree it resulted in a better shot. When you're all done, you can sit down and throw away the ones that didn't work.
Tuesday, October 16, 2007
Product Review: What magazine is best?
Today's tip is very simple. If you have thought about getting a magazine subscription, I strongly recommend Popular Photography & Imaging. I have had a subscription to it before, and after glancing through it tonight at a local bookstore I want to get it again.
There is no other photography magazine on the market today that is more jam-packed with photography tips, reviews, and how-to's. About three years ago they re-designed the magazine. Not only did they add Imaging to the title (to show digital photography's impact on photography) , but they have put more focus on cramming each issue full of concise, well-written articles.
Their reviews and tips cover a wide range of knowledge and experience levels, from beginner to advanced amateurs/semi-pro.
Check out their website (www.popphoto.com) for a taste. Or pick up a copy at the news stand.
There is no other photography magazine on the market today that is more jam-packed with photography tips, reviews, and how-to's. About three years ago they re-designed the magazine. Not only did they add Imaging to the title (to show digital photography's impact on photography) , but they have put more focus on cramming each issue full of concise, well-written articles.
Their reviews and tips cover a wide range of knowledge and experience levels, from beginner to advanced amateurs/semi-pro.
Check out their website (www.popphoto.com) for a taste. Or pick up a copy at the news stand.
Monday, October 15, 2007
Photo Tip: Shoot vertically for sports action
When shooting sports action, the best way to get the photo is to shoot vertically. Unless your sport involves someone laying down (like wrestling or swimming), shooting vertically will almost always give you the best composition.
Look at these two photos. Which one is better?
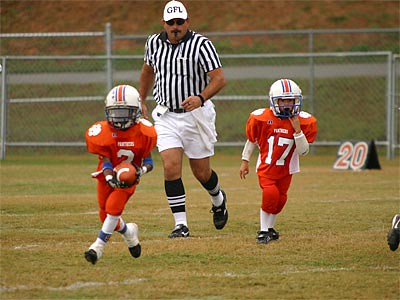

The horizontal one has too much wasted space on the sides. Even if I zoomed in to fill the frame from head to toe of the ballcarrier, there would still be plenty of wasted space. But the one shot vertically uses much more of the frame.
Sure, you could crop the horizontal photo, but unless you have a camera that shoots 10 megapixels or more, you will not get enough image information in a tight crop to make good prints. It may look fine on the web, but never framed and on your wall.
Look at these two photos. Which one is better?
The horizontal one has too much wasted space on the sides. Even if I zoomed in to fill the frame from head to toe of the ballcarrier, there would still be plenty of wasted space. But the one shot vertically uses much more of the frame.
Sure, you could crop the horizontal photo, but unless you have a camera that shoots 10 megapixels or more, you will not get enough image information in a tight crop to make good prints. It may look fine on the web, but never framed and on your wall.
Sunday, October 14, 2007
Photo Tip: Shooting through the fence
Even if you get access to the field, sometimes the best angle for capturing a great photo will have a fence between you and your subject. A lot of people will stand a few feet away from the fence and take the shot, but that results in a bad photo.
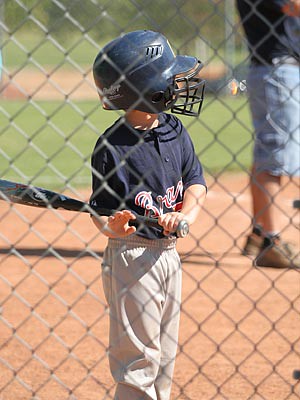
Instead, take advantage of your lens hood and put your lens right up against the fence. The lens hood will prevent the glass element from getting scratched, and your lens will be close enough to the fence that it will focus right through it. Be sure to line the lens up with one of the diamond-shaped gaps.
If you are not using a SLR with a telephoto lens, then the lens on your point and shoot camera will likely be small enough to actually fit through the gaps in the fence.
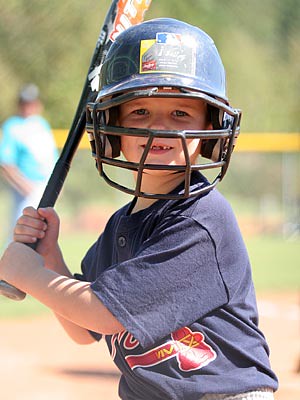
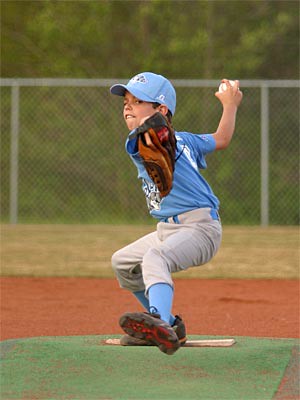
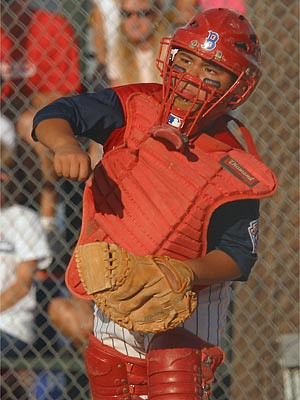
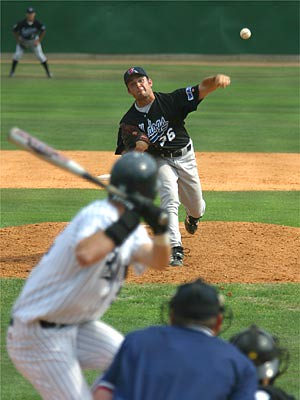
You can get some pretty amazing shots this way. For instance, in baseball and softball games, I will line up behind home plate and get a lot of great shots of the pitcher going through their complete windup and pitch. I have also shot batters and catchers this way.
All of these were shot through the fence.
Try it and you'll see -- it's not as hard as you think!
Instead, take advantage of your lens hood and put your lens right up against the fence. The lens hood will prevent the glass element from getting scratched, and your lens will be close enough to the fence that it will focus right through it. Be sure to line the lens up with one of the diamond-shaped gaps.
If you are not using a SLR with a telephoto lens, then the lens on your point and shoot camera will likely be small enough to actually fit through the gaps in the fence.
You can get some pretty amazing shots this way. For instance, in baseball and softball games, I will line up behind home plate and get a lot of great shots of the pitcher going through their complete windup and pitch. I have also shot batters and catchers this way.
All of these were shot through the fence.
Try it and you'll see -- it's not as hard as you think!
Saturday, October 13, 2007
Photo Tip: Always ask for permission before stepping onto the field
In yesterday's tip I said you should always ask for permission from the umpire before you set a foot inside the fence to take pictures. Why? The umpire is like the owner of the field. What he says goes. He has complete authority over everyone at the game, on the field and off.
What that also means is he has complete responsibility, too. If there is something dangerous going on during a game, like a toddler walking into the field of play, he is responsible if that child gets hurt. Umpires take a great deal upon their shoulders, and most of us don't realize it.
If you, as a photographer, ever get the ire of the umpire, you will likely get tossed out of the game immediately, even if all you are doing is taking photos from outside of the fence.
Try to do all you can to make sure the umpire is comfortable with you taking photos. Be professional and to the point. Introduce yourself as a photographer. Say why you are there.* Explain you understand the rules of the game. Then ask for permission to shoot inside the fence. You may want to add that you will stay far away from fair territory.
I use these guidelines all the time. I have been turned down only once, and that was at a tournament where the tournament director overturned the umpire's decision to let me in.
* I would suggest saying something other than, "I would like to get some photos of my kid." Instead, don't acknowledge you are a parent and say instead something like "The team (or some parents) have asked me to get pictures of their players." Of course, if you don't have professionally looking camera gear, like a SLR and a long telephoto lens, then expect to get turned down.
What that also means is he has complete responsibility, too. If there is something dangerous going on during a game, like a toddler walking into the field of play, he is responsible if that child gets hurt. Umpires take a great deal upon their shoulders, and most of us don't realize it.
If you, as a photographer, ever get the ire of the umpire, you will likely get tossed out of the game immediately, even if all you are doing is taking photos from outside of the fence.
Try to do all you can to make sure the umpire is comfortable with you taking photos. Be professional and to the point. Introduce yourself as a photographer. Say why you are there.* Explain you understand the rules of the game. Then ask for permission to shoot inside the fence. You may want to add that you will stay far away from fair territory.
I use these guidelines all the time. I have been turned down only once, and that was at a tournament where the tournament director overturned the umpire's decision to let me in.
* I would suggest saying something other than, "I would like to get some photos of my kid." Instead, don't acknowledge you are a parent and say instead something like "The team (or some parents) have asked me to get pictures of their players." Of course, if you don't have professionally looking camera gear, like a SLR and a long telephoto lens, then expect to get turned down.
Photo Tip: Best way to catch a catcher
Most people won't think about it, but one of the hardest positions in baseball (or softball) to photograph is the catcher. Most of the time you are watching the ball, the batter, the pitcher, or the fielders. It's easy to forget about the catcher. And when you do remember, you also have a batter and an umpire crowding the photo.
I have found the best time to get photos of the catcher is during the first inning warmups. This is when the pitcher goes out and finishes warming up his arm and throws up to a dozen pitches at game speed. There is no batter, no umpire. Just the pitcher and his catcher.
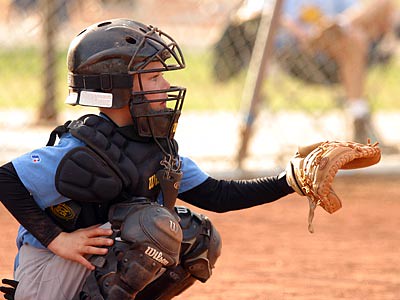
There are three specific things I look for when taking pictures of the catcher during warmups. First, I want to get close enough to get a good, tight shot of just his upper body and extended glove while he waits for a pitch. This should give a pretty good view of his face through the face mask, and isolates the photo to just him. Like this shot.
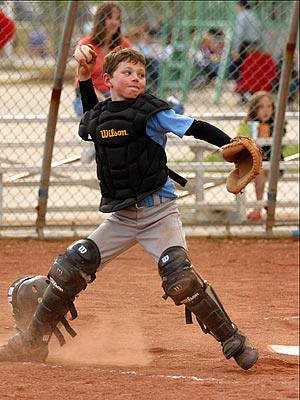
Second, I also look for a shot of him making the throw to second base, as if a runner was trying to steal. This throw is usually announced before the pitch by the catcher yelling out "Coming down!"
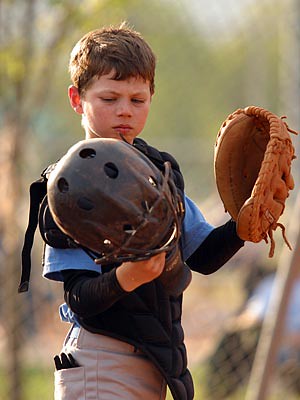
Third, I try to get any shot of him with his helmet and mask in his hand and his face exposed. These can be unpredictable and hard to catch, so be on the lookout at all times for these when shooting catchers. Mothers just love that kind of shot because it shows their favorite player in a position that definitely speaks 'catcher' but the face is easy to see, like this.
Finally, just a few more pointers about shooting catchers.
I have found the best time to get photos of the catcher is during the first inning warmups. This is when the pitcher goes out and finishes warming up his arm and throws up to a dozen pitches at game speed. There is no batter, no umpire. Just the pitcher and his catcher.
There are three specific things I look for when taking pictures of the catcher during warmups. First, I want to get close enough to get a good, tight shot of just his upper body and extended glove while he waits for a pitch. This should give a pretty good view of his face through the face mask, and isolates the photo to just him. Like this shot.
Second, I also look for a shot of him making the throw to second base, as if a runner was trying to steal. This throw is usually announced before the pitch by the catcher yelling out "Coming down!"
Third, I try to get any shot of him with his helmet and mask in his hand and his face exposed. These can be unpredictable and hard to catch, so be on the lookout at all times for these when shooting catchers. Mothers just love that kind of shot because it shows their favorite player in a position that definitely speaks 'catcher' but the face is easy to see, like this.
Finally, just a few more pointers about shooting catchers.
- Position yourself so his body opens up to you when catching and throwing. That means shoot from the first base line for a right-handed catcher, and vice-versa for a lefty.
- In youth sports, using a 70-200mm lens (or something similar) will give you enough range to shoot from the dugout area or near the coach's box. High school and higher level baseball will usually need something with more reach, like a 300mm lens.
- Get down on their level. If they are crouching, then you need to crouch. If they are standing up to make a throw, then you can stand up.
- And the most important thing is to always ask the umpires for permission to step out onto the field of play. This applies for foul territory, too! What I usually do is show up before the game starts and ask the umpires while the two teams are warming up. I will talk more about this tomorrow.
Wednesday, October 10, 2007
Photo Tip: Overcoming camera shake at low shutter speeds
In addition to everything else I do, I am also an Assistant Scoutmaster for our church's troop. Tonight we did something very special. We retired an American flag.
Our church has over 100 temples worldwide. We are fortunate to have one in Atlanta, and Troop 566 had been asked to retire its flag. As fitting for a large building, it had a large flag -- 15 feet long!
We used eight Scouts in the effort to remove the old flag and hoist its new replacement. I was asked to document the whole event with photos, which was challenging since the sun had already set and by the time we were done it was quite dark.
Near the end of the ceremony, I wanted to get a photo of the new flag rising on the flagpole with the Scouts saluting it. I didn't want to use the flash because it would light up the parking lot in front of me but not add much light to the scene I was trying to capture. However, without the flash the shutter speed was registering around 1/10th of a second -- way too slow for the typical hand-held shot. And I didn't have a tripod.
So what did I do to improvise? I used my camera's high-speed frame rate. I have a Canon 20D, which shoots at five frames a second. Standing as still as possible, I held down the shutter button and fired off 13 shots in rapid succession. When I sat down at the computer to view them, five were in focus.
This is the best one.

The shot above was taken at 1/6th of a second with the lens set at f2.8 and film speed set to ISO 400. Pretty amazing!
So why did it work? No matter how still you try to stand, your body is still going to move and sway in tiny increments. If the shutter speed is faster than 1/50th of a second, it overcomes this movement. But if it is below 1/30th of a second, then you will suffer from camera shake.
By holding down the shutter button for several frames, the camera captured several shots when I was actually motionless -- in those split second moments when my body, arms, and hands were absolutely still.
Do you have to have five frames per second to do this? No. I have successfully done it on some of my older cameras that were at 3 fps. While I haven't personally done it with a slower frame rate than that, don't be afraid to try it with your point and shoot cameras, too. There's no harm done in trying!
Our church has over 100 temples worldwide. We are fortunate to have one in Atlanta, and Troop 566 had been asked to retire its flag. As fitting for a large building, it had a large flag -- 15 feet long!
We used eight Scouts in the effort to remove the old flag and hoist its new replacement. I was asked to document the whole event with photos, which was challenging since the sun had already set and by the time we were done it was quite dark.
Near the end of the ceremony, I wanted to get a photo of the new flag rising on the flagpole with the Scouts saluting it. I didn't want to use the flash because it would light up the parking lot in front of me but not add much light to the scene I was trying to capture. However, without the flash the shutter speed was registering around 1/10th of a second -- way too slow for the typical hand-held shot. And I didn't have a tripod.
So what did I do to improvise? I used my camera's high-speed frame rate. I have a Canon 20D, which shoots at five frames a second. Standing as still as possible, I held down the shutter button and fired off 13 shots in rapid succession. When I sat down at the computer to view them, five were in focus.
This is the best one.

The shot above was taken at 1/6th of a second with the lens set at f2.8 and film speed set to ISO 400. Pretty amazing!
So why did it work? No matter how still you try to stand, your body is still going to move and sway in tiny increments. If the shutter speed is faster than 1/50th of a second, it overcomes this movement. But if it is below 1/30th of a second, then you will suffer from camera shake.
By holding down the shutter button for several frames, the camera captured several shots when I was actually motionless -- in those split second moments when my body, arms, and hands were absolutely still.
Do you have to have five frames per second to do this? No. I have successfully done it on some of my older cameras that were at 3 fps. While I haven't personally done it with a slower frame rate than that, don't be afraid to try it with your point and shoot cameras, too. There's no harm done in trying!
Monday, October 8, 2007
Photo Tip: Don't be afraid to take a lot of shots
With today's digital cameras it is easy to take a lot of photos. And I mean a lot of photos! And that is what today's tip is all about.
Don't be afraid to take a lot of shots. Whether you are having some friends pose for a picture, or you are trying to capture a candid moment, take several pictures. In fact, I would say the more candid the situation, the more shots you should get.
When you are done, don't worry about keeping them all. Just choose the best one or two and discard the rest.
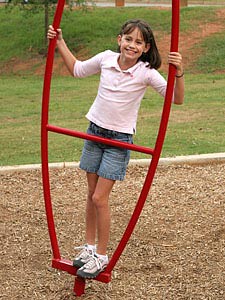
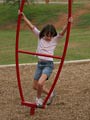
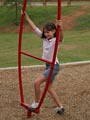
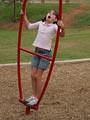
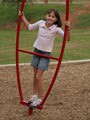
Let me show you what I mean. In yesterday's photo tip I showed a photo taken at the park. I love the photo. It really captured my daughter's smile and fun-loving personality. What I didn't show you is how many attempts I took at capturing that one shot. In this instance there were 12:
When I got home I looked through them all, found the one that really stood out from the rest, and moved it into a special folder on my hard drive of the best photos of my daughter. And just because I love her so much, here it is again!
Don't be afraid to take a lot of shots. Whether you are having some friends pose for a picture, or you are trying to capture a candid moment, take several pictures. In fact, I would say the more candid the situation, the more shots you should get.
When you are done, don't worry about keeping them all. Just choose the best one or two and discard the rest.
Let me show you what I mean. In yesterday's photo tip I showed a photo taken at the park. I love the photo. It really captured my daughter's smile and fun-loving personality. What I didn't show you is how many attempts I took at capturing that one shot. In this instance there were 12:
 |  |  |
 |  |  |
 |  |  |
 |  |  |
When I got home I looked through them all, found the one that really stood out from the rest, and moved it into a special folder on my hard drive of the best photos of my daughter. And just because I love her so much, here it is again!
Subscribe to:
Posts (Atom)



 Posts
Posts

