I know some might think of this as shameless plugging of the company that employs me, but if you want to know how film and digital cameras work, then you can't beat the explanations at HowStuffWorks.com. Check them out for yourself!
How Cameras Work
How Digital Cameras Work
Tuesday, November 6, 2007
Basic Photo Tip: Light
Light is the most basic element in photography. In fact, the word photography comes from two Greek words meaning light and writing, so it literally means writing with light. The amount of light, its intensity, and its direction can make or break a photo more than anything else, except for maybe focus.
Natural light usually provides the most pleasing, natural-looking shots. This includes direct lighting, straight from the sun, and ambient light. Ambient light is light reflected off of or shining through objects. Examples of this are light reflecting off of a wall, shiny surface, or through thin curtains. Without ambient light, objects in shadow would be completely black.
Sometimes, however, there isn’t enough natural and ambient light to take a photo. That’s when a flash comes in. The camera’s flash creates enough light to take a photo, but it usually doesn’t have much range.
Getting the exposure right for the given amount of light is critical. It can make or break a photo. For more information on exposure, see the lesson on exposure and shutter speed.
Basic Photo Tip: Exposure and shutter speed
Many of you have probably heard the term exposure before. But what is it exactly? It is the total amount of light that falls on the camera’s film or digital sensor while taking a photo. Too much light and the photo will be over-exposed, making the shot too bright with little detail because features will be washed out. Too little light and the photo will be too dark, making it difficult to make out the details.
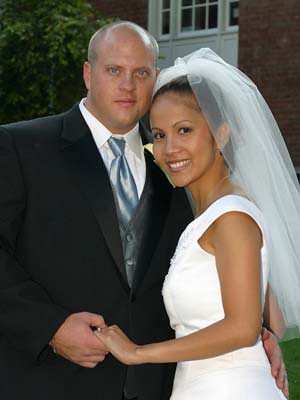
A properly exposed shot will have a great range of light, allowing you to see detail in the shadows along with highlights in bright areas. A really good example of this is in wedding photography. The right exposure will let you see the details in the groom’s black tuxedo but also see the lines and patterns in the bride’s white wedding gown.
In the past, photographers usually had to draw upon their experience to determine what exposure to use. But thanks to advancements in technology, all modern cameras have light meter built in to eliminate the guess work.
Thanks to this tool, your camera will generally pick the right settings to properly expose your photo. But it’s not fool proof. See the lesson on exposure compensation for an explanation of how it works will help you pick the right exposure when your camera doesn’t.
But just because your camera can pick the right exposure doesn’t mean the photo will come out right. You also need to pay attention to your shutter speed. If it gets too slow, then you will risk moving the camera while taking the photo. This is normally called camera shake.
With a normal, non-telephoto lens, you need a shutter speed of 1/60 of a second to guarantee there won’t be any camera shake. That is why when a flash is needed, most cameras will set the flash intensity to be strong enough to get a photo at 1/60 of a second.
However, if you practice good technique while holding the camera, you can often get a sharp clear image free of camera shake all the way down to 1/30 of a second. Good technique means you stand with your feet spread comfortably apart, with two hands holding the camera, your elbows resting on your chest, and holding your breath. It may also help to lean your body against a wall or post.
If you use a tripod, however, you can go with long shutter speeds and not worry about camera shake. The tripod will keep the camera stationary, allowing you to get outstanding, clear photos even with exposure times reaching into several seconds.
But what about those times when you don’t have a tripod, or your subject is moving and long exposures won’t work? The lesson on aperture and ISO speeds has your answer.
Basic Photo Tip: Aperture and ISO speeds
So you have a great shot to take, but you don’t have a fast enough shutter speed. What can you do without using your flash? There are actually two options – open up your aperture or change your film speed.
So what’s your aperture? The aperture refers to a numerical representation of how wide the lens opening is inside the lens. On all SLR and most point-and-shoot digital cameras, you can open or close your aperture to let more light or less through.
Many people think a lens has only one fixed opening for how much light gets through. But that is not true. The vast majority of cameras (some point-and-shoot film cameras being the lone exception here) have the ability to change the lens’ aperture and let more light through. This is commonly called the f-stop of a lens. The bigger the opening, the more light comes through, and the faster the shutter speed can be.
Similarly, you can change the film speed and get the same results. The higher the film speed, the more reactive to light the film or sensor is, and the faster the shutter speed can be.
This is where one of the biggest strengths of digital cameras comes in. Whereas with film cameras you can change the film speed only by changing the whole roll of film for a new one, with digital you can change the film speed through a camera setting. So if you are shooting at 100 ISO film speed and you notice it is getting a little dark, you can change a digital camera to 200 ISO in between shots and keep going. ISO 200 film is twice as reactive to light as 100 ISO, so it will double your shutter speed.
That is the key to understanding exposure. Being able to double your shutter speed is called one stop of exposure. Therefore, going from 1/125 of a second to 1/250 is one stop, going from 1/125 to 1/500 is two stops, and going from 1/125 to 1/1000 is three stops.
Keeping track of stops with shutter speeds is very simple. Aperture values, on the other hand, are more complex. They start with a very low number (like f2.0) and go up, but not in a scale you would think as logical. A f2 aperture setting creates a large opening in the lens and lets in a lot of light. A f2.8 aperture lets in half of the light as f2, and therefore is one stop less. Two stops less light will be f4, and f5.6 would be three stops less.
Below is a scale showing all of the normal shutter speeds and aperture values, set one stop apart. If your camera was saying that a photo will be properly exposed at 1/125 of a second with an aperture set to f8, then all of the settings below will result in exactly the same exposure.
Similarly, if you changed your film speed between shots, all of these would result in the same exposure, too.
Do you see the relationship? As your shutter speed goes up, your aperture value needs to go down. The opposite is also true. As your aperture value goes up, your shutter speed will go down. The key here is to remember that the higher the aperture value, the smaller the lens opening and the less light goes through to expose the photo.
So what’s your aperture? The aperture refers to a numerical representation of how wide the lens opening is inside the lens. On all SLR and most point-and-shoot digital cameras, you can open or close your aperture to let more light or less through.
Many people think a lens has only one fixed opening for how much light gets through. But that is not true. The vast majority of cameras (some point-and-shoot film cameras being the lone exception here) have the ability to change the lens’ aperture and let more light through. This is commonly called the f-stop of a lens. The bigger the opening, the more light comes through, and the faster the shutter speed can be.
Similarly, you can change the film speed and get the same results. The higher the film speed, the more reactive to light the film or sensor is, and the faster the shutter speed can be.
This is where one of the biggest strengths of digital cameras comes in. Whereas with film cameras you can change the film speed only by changing the whole roll of film for a new one, with digital you can change the film speed through a camera setting. So if you are shooting at 100 ISO film speed and you notice it is getting a little dark, you can change a digital camera to 200 ISO in between shots and keep going. ISO 200 film is twice as reactive to light as 100 ISO, so it will double your shutter speed.
That is the key to understanding exposure. Being able to double your shutter speed is called one stop of exposure. Therefore, going from 1/125 of a second to 1/250 is one stop, going from 1/125 to 1/500 is two stops, and going from 1/125 to 1/1000 is three stops.
Keeping track of stops with shutter speeds is very simple. Aperture values, on the other hand, are more complex. They start with a very low number (like f2.0) and go up, but not in a scale you would think as logical. A f2 aperture setting creates a large opening in the lens and lets in a lot of light. A f2.8 aperture lets in half of the light as f2, and therefore is one stop less. Two stops less light will be f4, and f5.6 would be three stops less.
Below is a scale showing all of the normal shutter speeds and aperture values, set one stop apart. If your camera was saying that a photo will be properly exposed at 1/125 of a second with an aperture set to f8, then all of the settings below will result in exactly the same exposure.
| Shutter | 1/15 | 1/30 | 1/60 | 1/125 | 1/250 | 1/500 |
| Aperture | f22 | f16 | f11 | f8 | f5.6 | f4 |
| ISO | 100 | 100 | 100 | 100 | 100 | 100 |
Similarly, if you changed your film speed between shots, all of these would result in the same exposure, too.
| Shutter | 1/15 | 1/30 | 1/60 | 1/125 | 1/250 | 1/500 |
| Aperture | f8 | f8 | f8 | f8 | f8 | f8 |
| ISO | 100 | 200 | 400 | 800 | 1600 | 3200 |
Do you see the relationship? As your shutter speed goes up, your aperture value needs to go down. The opposite is also true. As your aperture value goes up, your shutter speed will go down. The key here is to remember that the higher the aperture value, the smaller the lens opening and the less light goes through to expose the photo.
Basic Photo Tip: Using light to your advantage
Now that we have a better understanding of exposure, let’s go back and visit the topic of light again. Not all types of light are the same, and certain kinds of light are better than others.
For many subjects, direct sunlight can be very flattering. This is especially true for landscapes, architectural, and sports. Take, for instance, this photo of Main Hall at Southern Virginia University. It was taken in the middle of the afternoon with the sun shining directly on the face of building. It looks great!

For other subjects, however, direct sunlight can be harsh and unflattering. Many portraits are this way.
When taking photos of people, you usually don’t want the sunlight to be shining directly in their faces. It can cause people to squint and wrinkle up their faces. In fact, the only time I like to use direct sunlight in portraits is late in the day, during the last hour before the sun sets. This light is diffused greatly through the layers of the atmosphere at this time of the day, which results in a softer, warmer light than what you have during midday.
Ambient light is much better for portraits and general people photos. There are several things that can be the source of your ambient light – the open sky above, reflecting from off a wall, or filtering through curtains.
What’s even better is when you can use ambient light that is coming primarily from one direction. If you can have the light coming slightly from the side and the front at the same time, then that is ideal. It will create slight shading across the face, which will help create a three dimensional effect.
Take a look at this photo of my daughter. It was taken at a swim meet, and she was waiting for her event. She was sitting in the shade, but the ambient light was coming from above her and to her right. The soft ambient light created faint, soft shadows on her face which allows you easily see how it is shaped.

Since it is coming straight from your camera, light from your flash can cause all of the shadows to disappear and effectively flatten the details of your subjects face. There are some tricks you can use with your flash, though, that will enhance a photo.
For instance, if you have a dedicated flash attached to your camera you can point the flash into the ceiling above or an adjacent wall. This is called bouncing your flash, and it works best when you use a white wall. In this photo, I captured my niece licking the spatula from mixing a cake. I bounced the flash off of the ceiling, creating a much better photo than if I aimed it right at her face.

Notice the light of the bounced flash is reflecting in her eyes. This kind of light reflection really helps your subject seem alive, whether you are shooting a person or an animal. Look for ways to capture that and your photos will improve dramatically.
You can also use the flash to fill in where the dominant light source is directly behind the subject, as in these two photos.

Because of the bright background, the camera was fooled into thinking it didn't need to use the flash. For the second shot, the flash was used to fill in the dark foreground.

For many subjects, direct sunlight can be very flattering. This is especially true for landscapes, architectural, and sports. Take, for instance, this photo of Main Hall at Southern Virginia University. It was taken in the middle of the afternoon with the sun shining directly on the face of building. It looks great!
For other subjects, however, direct sunlight can be harsh and unflattering. Many portraits are this way.
When taking photos of people, you usually don’t want the sunlight to be shining directly in their faces. It can cause people to squint and wrinkle up their faces. In fact, the only time I like to use direct sunlight in portraits is late in the day, during the last hour before the sun sets. This light is diffused greatly through the layers of the atmosphere at this time of the day, which results in a softer, warmer light than what you have during midday.
Ambient light is much better for portraits and general people photos. There are several things that can be the source of your ambient light – the open sky above, reflecting from off a wall, or filtering through curtains.
What’s even better is when you can use ambient light that is coming primarily from one direction. If you can have the light coming slightly from the side and the front at the same time, then that is ideal. It will create slight shading across the face, which will help create a three dimensional effect.
Take a look at this photo of my daughter. It was taken at a swim meet, and she was waiting for her event. She was sitting in the shade, but the ambient light was coming from above her and to her right. The soft ambient light created faint, soft shadows on her face which allows you easily see how it is shaped.
Since it is coming straight from your camera, light from your flash can cause all of the shadows to disappear and effectively flatten the details of your subjects face. There are some tricks you can use with your flash, though, that will enhance a photo.
For instance, if you have a dedicated flash attached to your camera you can point the flash into the ceiling above or an adjacent wall. This is called bouncing your flash, and it works best when you use a white wall. In this photo, I captured my niece licking the spatula from mixing a cake. I bounced the flash off of the ceiling, creating a much better photo than if I aimed it right at her face.
Notice the light of the bounced flash is reflecting in her eyes. This kind of light reflection really helps your subject seem alive, whether you are shooting a person or an animal. Look for ways to capture that and your photos will improve dramatically.
You can also use the flash to fill in where the dominant light source is directly behind the subject, as in these two photos.
Because of the bright background, the camera was fooled into thinking it didn't need to use the flash. For the second shot, the flash was used to fill in the dark foreground.
Basic Photo Tip: Rule of thirds
One great way to improve your photography is to always remember the rule of thirds. Simply split your frame into thirds, both horizontally and vertically. This will crate something like a tic-tac-toe diagram, with four intersecting points in the middle. You now have several places to position the focal point of your photo – at any of the four points and along one of the four vertical or horizontal lines.
Confused? Don’t worry about it. Let me show you some examples.

Instead of putting the skyline in the horizontal center of the photo, I put it two-thirds of the way down. I felt the clouds were the focal point, so I wanted to feature them more than the reflection.
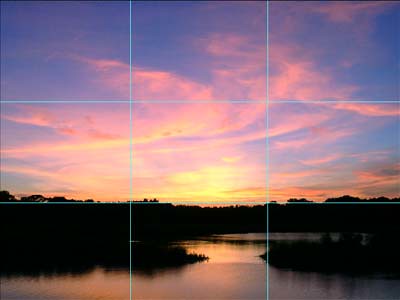
Landscapes and water reflection shots should be put one-third up from the bottom or one-third down from the top, but hardly ever dead center. The exception to that rule usually happens when you are trying to have total symmetry between the top and bottom of a reflective photo.


For this portrait of my wife, I wanted to do something different than a typical photo. So I turned the photo horizontally, and put her one-third of the way into the photo from the left, leaving plenty of empty space in the direction she is looking.

If you take a typical vertical portrait, be sure to put the face or the eyes along the line one-third down from the top, as in the revised photo of my wife.


In this photo, both my daughter and the house were important. But the focal point was still my daughter. By putting her on one side, I could still include the house and have a good balance between the two.
Confused? Don’t worry about it. Let me show you some examples.
Instead of putting the skyline in the horizontal center of the photo, I put it two-thirds of the way down. I felt the clouds were the focal point, so I wanted to feature them more than the reflection.
Landscapes and water reflection shots should be put one-third up from the bottom or one-third down from the top, but hardly ever dead center. The exception to that rule usually happens when you are trying to have total symmetry between the top and bottom of a reflective photo.
For this portrait of my wife, I wanted to do something different than a typical photo. So I turned the photo horizontally, and put her one-third of the way into the photo from the left, leaving plenty of empty space in the direction she is looking.
If you take a typical vertical portrait, be sure to put the face or the eyes along the line one-third down from the top, as in the revised photo of my wife.
In this photo, both my daughter and the house were important. But the focal point was still my daughter. By putting her on one side, I could still include the house and have a good balance between the two.
Basic Photo Tip: Framing and leading lines
Framing and using leading lines can do wonders for your photography. They can take a good photo and make it great. Using these elements properly can really rivet your viewer’s attention to your photo.
Framing is using something in the photo to frame the subject. You can frame the subject with two tree trunks, in a mirror, through a window, under an archway, or in any other similar way. You often see this in portrait and wedding photography.
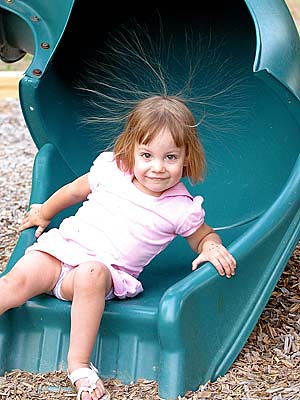
Below is one of my favorite photos. Here I use the bottom of a curved playground slide to frame the face and hair of my youngest daughter. It’s a very simple framing technique, but works really well.
In other example of framing, let's go back to the photo of my daughter waiting for her event at a swim meet. I used the out-of-focus bodies of two other swimmers to frame her face.
As for leading lines, look to see if there are any natural elements that will lead the viewer’s eye into the photo or towards the subject when you are composing a photo. These leading lines can be things like a path, roadway, river, railing, or even clouds in the sky.
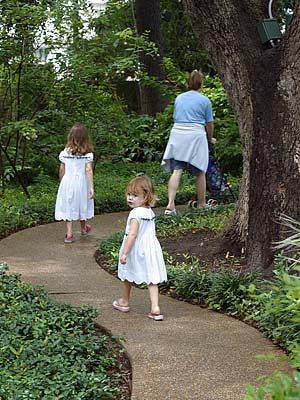
In the next photo, we were walking around the gardens surrounding the Alamo in San Antonio. I just loved the shot of my daughter following the rest of the family, but turning around to make sure I was following to. Notice how the path keeps your attention in the photo.
In my photo below of the Blue Ridge Parkway, the curving road leads the viewer’s eye into the center of the photo.
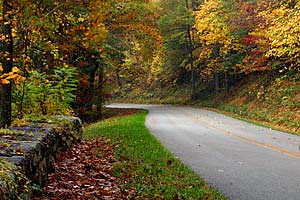
Leading lines can do wonders to subconsciously keep them looking at the photo, but only if they lead the view into the shot. Leading lines can easily draw the viewers eye out of the photo, too.
Because the road in the photo above disappears before reaching the left edge, it helps keep the viewer’s eye in the photo. If I had composed the photo so the road went from one edge to the other, I would have risked the viewer’s eye going out of the photo. Then the viewer could easily loose interest.
Framing is using something in the photo to frame the subject. You can frame the subject with two tree trunks, in a mirror, through a window, under an archway, or in any other similar way. You often see this in portrait and wedding photography.
Below is one of my favorite photos. Here I use the bottom of a curved playground slide to frame the face and hair of my youngest daughter. It’s a very simple framing technique, but works really well.
In other example of framing, let's go back to the photo of my daughter waiting for her event at a swim meet. I used the out-of-focus bodies of two other swimmers to frame her face.
As for leading lines, look to see if there are any natural elements that will lead the viewer’s eye into the photo or towards the subject when you are composing a photo. These leading lines can be things like a path, roadway, river, railing, or even clouds in the sky.
In the next photo, we were walking around the gardens surrounding the Alamo in San Antonio. I just loved the shot of my daughter following the rest of the family, but turning around to make sure I was following to. Notice how the path keeps your attention in the photo.
In my photo below of the Blue Ridge Parkway, the curving road leads the viewer’s eye into the center of the photo.
Leading lines can do wonders to subconsciously keep them looking at the photo, but only if they lead the view into the shot. Leading lines can easily draw the viewers eye out of the photo, too.
Because the road in the photo above disappears before reaching the left edge, it helps keep the viewer’s eye in the photo. If I had composed the photo so the road went from one edge to the other, I would have risked the viewer’s eye going out of the photo. Then the viewer could easily loose interest.
Basic Photo Tip: Exposure compensation
In the vast majority of photos, if you took all of the colors in the photo (when properly exposed) and swirled them all together, it would come out as a medium grey. They call this 18% grey. The light meter in your camera is designed to expose your photos to match 18% grey.
Most of the time this works with fantastic results. It is simply amazing that such a basic idea works out 80% of the time. However, there are a few instances when 18% grey won't work.
If you have an overly bright photo, like kids playing in the snow, your shot will likely have grey-colored snow. If the photo is overly dark, like a close-up of three Oakland Raiders in their black home uniforms, your shot will likely have grey uniforms and overexposed faces. The 18% grey is the culprit in both situations.
You can get past this problem by using the exposure compensation setting on your camera. Most cameras have it, even point-and-shoots. It allows you to add or subtract exposure from your shot.
By adding in one to two stops* of extra exposure in your shot of snow, everything should turn out looking bright and white. Similarly, by subtracting one to two stops of exposure in the close-up of the Raiders players, the uniforms should be brought down to their usual black.
You may need to experiment a little with what works best in each of your photo taking situations. Just don’t forget to dial that exposure compensation back to zero when you are done, or you will likely regret it the next time you pull out your camera!
*for information about what a stop is, see the lesson on aperture and ISO speeds.
Thursday, November 1, 2007
Product Review: Picaboo software and service
My wife has just gotten into digital scrapbooking, and while researching software to use we found a free package called Picaboo. It has really intrigued me. Picaboo is more than just a program, it's also a publishing service.
Here's how it works. You can download the Picaboo software for free, design your photo books and cards, and then upload them to the Picaboo servive for printing and delivery.
I have downloaded the software for a try out. The software is easy to use, and I'm in the midst of creating a photo book of my kid's experience on the swim team last summer. When I am done, I will get it printed from the Picaboo service. Then I will let you know how the book turned out, what I thought of the software, and my overall opinion.
If you don't want to wait, you can check out the software for yourself at www.picaboo.com.
Tuesday, October 30, 2007
Photo Tip: Using a fill flash
One of my friends got a thrill of a lifetime today -- he got to walk on a tower crane 54 stories up!
Next to our building in the Buckhead area of Atlanta is a 50-story skyscraper in the midst of construction. The HowStuffWorks team was invited to go to the top of the building and video tape some of the construction and views as they laid the 50th floor with cement.
On the way to the top, they stopped to get a photo with a backdrop of downtown Atlanta. The first photo didn't turn out so well because it was bright in the background, but not so bright in the foreground.
Because of the bright background, the camera was fooled into thinking it didn't need to use the flash. For the second shot, the flash was used to fill in the dark foreground.
Much better! Even though it was plenty bright to see on the open floor of the skyscraper, there was too much difference in light between the background and the foreground to get a good exposure for both.
In photography, we call the measurements of light 'stops'. If the foreground was half as dark as the background, then that is one stop. In this case, the background was more than four times brighter than the foreground.
How do I know? Because the vast majority of digital cameras can't capture more than four stops of light in the same exposure. That is why the foreground was too dark when the background was properly exposed. By using the flash, we evened out the differences between the foreground and background.
Thanks, Scott, for letting me use your photos!
Saturday, October 27, 2007
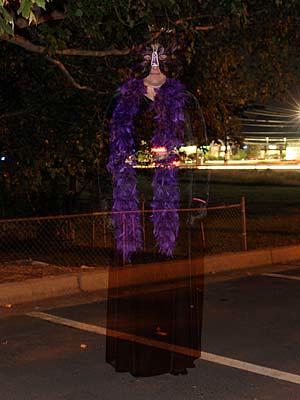
Photo Tip: How to shoot a ghost
Just in time for Halloween, here's tip sure to fire up the kids. Turn them into ghosts!
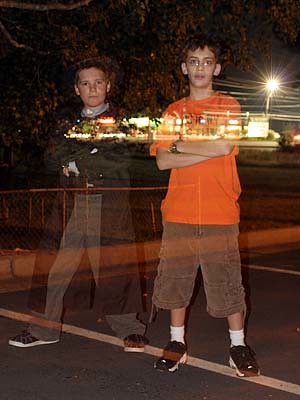
Here's how I did it, in general terms. I put the camera on a tripod and set it so it would properly expose the shot without the flash, but had the flash fire anyway. As soon as the flash fired, the kids walked out of the picture. The flash illuminated the kids, and the rest of the scene was illuminated with the natural lighting through a long exposure.
Now for the specifics. With the camera on a tripod, I set the film speed to the lowest setting (ISO 100 for my Canon 20D). Then I put the camera in manual mode and set it to 3.2 seconds for the shutter speed and f5.6 for the aperture. You may need to play around with the aperture and shutter speeds to see what works best for your situation -- f5.6, ISO 100, and 3.2 seconds worked for my lighting situation, but may not for you.
I was taking the photos in our church's parking lot after a Halloween Party. They posed under an oak tree, which helped shade the light from the parking lot lights. I positioned the kids where the illuminated signs were directly behind them.
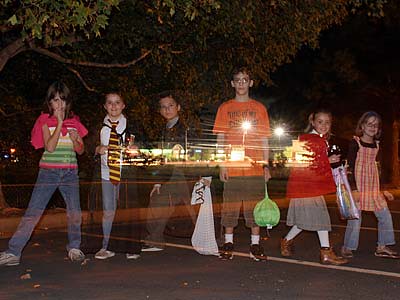
You need to do something similar. Find a dark place without much light (but enough to see). Figure out how long the exposure needs to be. The idea works better with dark clothing instead of light (light-colored clothing will possibly streak as the subject walks away). Finally, have something bright or light-colored behind the subjects so it will easily shine through their bodies, creating the illusion that they are ghosts.
Be prepared to experiment some to find what works best. And most of all, have some fun!
Here's how I did it, in general terms. I put the camera on a tripod and set it so it would properly expose the shot without the flash, but had the flash fire anyway. As soon as the flash fired, the kids walked out of the picture. The flash illuminated the kids, and the rest of the scene was illuminated with the natural lighting through a long exposure.
Now for the specifics. With the camera on a tripod, I set the film speed to the lowest setting (ISO 100 for my Canon 20D). Then I put the camera in manual mode and set it to 3.2 seconds for the shutter speed and f5.6 for the aperture. You may need to play around with the aperture and shutter speeds to see what works best for your situation -- f5.6, ISO 100, and 3.2 seconds worked for my lighting situation, but may not for you.
I was taking the photos in our church's parking lot after a Halloween Party. They posed under an oak tree, which helped shade the light from the parking lot lights. I positioned the kids where the illuminated signs were directly behind them.
You need to do something similar. Find a dark place without much light (but enough to see). Figure out how long the exposure needs to be. The idea works better with dark clothing instead of light (light-colored clothing will possibly streak as the subject walks away). Finally, have something bright or light-colored behind the subjects so it will easily shine through their bodies, creating the illusion that they are ghosts.
Be prepared to experiment some to find what works best. And most of all, have some fun!
Friday, October 26, 2007
Photo Tip: Protect your camera with a camera bag
The most practical tip I can give is something many people don't think about. Protect your camera! There is no better way to do this than putting your camera into a camera bag. It will help protect your camera from being bumped, dropped, or even scratched with keys and coins while inside your pocket or your purse.
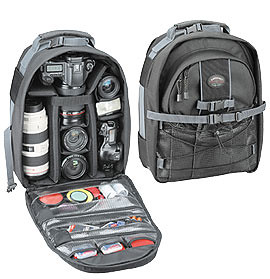 I personally use the Tamrac 5375 Photo Backpack. It is rugged, padded, and has plenty of storage for two cameras, a flash, and four lenses. I can also pack it with two spare camera batteries, eight spare flash batteries, several memory cards, and a bunch of odds and ends.
But most of you have just a point-and-shoot camera and don't need all of that room and versatility. While my bag cost over $100, a small camera bag for a point-and-shoot should cost only $10 to $20 and there are a wide variety from which to choose.
One word of caution, however. Camera bags have a tendency to announce to potential thieves that you are carrying a camera, especially if the bag has something like Canon or Nikon printed on it (like many do). Be extra careful and don't leave your camera bag unattended.
But you can use something else to put your point-and-shoot cameras in. I suggest a baby bottle bag! Something like one of these will do wonderfully:
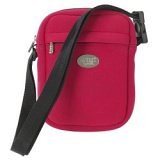
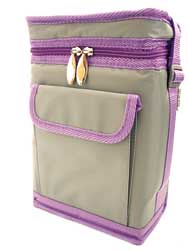
In a baby bottle bag you have plenty of room for a camera, spare batteries, and an extra memory card. You will also have enough room for something like a lens cloth and cleaning solution or a bean bag (which makes a great improvised camera stand). Best of all, because the bag says something other than Canon or Nikon, who would want to take it? No one wants to steal a baby's bottle!
I personally use the Tamrac 5375 Photo Backpack. It is rugged, padded, and has plenty of storage for two cameras, a flash, and four lenses. I can also pack it with two spare camera batteries, eight spare flash batteries, several memory cards, and a bunch of odds and ends.But most of you have just a point-and-shoot camera and don't need all of that room and versatility. While my bag cost over $100, a small camera bag for a point-and-shoot should cost only $10 to $20 and there are a wide variety from which to choose.
One word of caution, however. Camera bags have a tendency to announce to potential thieves that you are carrying a camera, especially if the bag has something like Canon or Nikon printed on it (like many do). Be extra careful and don't leave your camera bag unattended.
But you can use something else to put your point-and-shoot cameras in. I suggest a baby bottle bag! Something like one of these will do wonderfully:
In a baby bottle bag you have plenty of room for a camera, spare batteries, and an extra memory card. You will also have enough room for something like a lens cloth and cleaning solution or a bean bag (which makes a great improvised camera stand). Best of all, because the bag says something other than Canon or Nikon, who would want to take it? No one wants to steal a baby's bottle!
Wednesday, October 24, 2007
Photo Tip: Block out the sun!
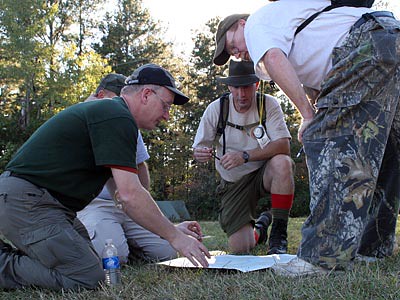
In my last tip, I showed a bunch of Scouters trying to determine where we were on a topographical map. I had laid down on the ground for a different perspective, positioning myself on the side of the group that offered the best viewing angle of their faces. The problem was I was shooting directly into the sun!

So what did I do? I moved slightly until the sun was being blocked by one of the subjects. Because of how late it was in the afternoon, there was plenty of light coming from the rest of the sky. What resulted was a pleasantly illuminated photo.
So don't be worried about shooting directly into the sun -- just use something that will block it's intense light. If the subjects you are shooting are in deep shadow because the sun is behind them, which often happens in the middle part of the day, then use your flash to lighten them up. Most point and shoot cameras have a button that will force your flash to fire no matter what. Just use that to make the flash fire in bright daylight.
However, there are times when sunlight into the lens (or at least striking the lens even if it isn't in the shot) can add spectacular effects. Don't be afraid to experiment and see what happens. Just be careful not to look into the sun directly through the lens, especially with a telephoto lens. It can cause eye damage!
Sunday, October 21, 2007
Photo Tip: Change your perspective
I have been very busy at work, and I apologize for not having a tip of the day for the past several days. However, this weekend I participated in Outdoor Leadership Training for the Boy Scouts of America and I got a ton of photos.
One of the training classes we participated in was Orienteering. After receiving our instructions, we had a challenge to take a topography map and determine the exact location of the tent we were at.
With the map on the ground, we took our compasses and tried to determine exactly where we were. I took several photos of my patrol trying to figure it out. Some were from the typical standing position, looking over shoulders. Here is probably the best one:
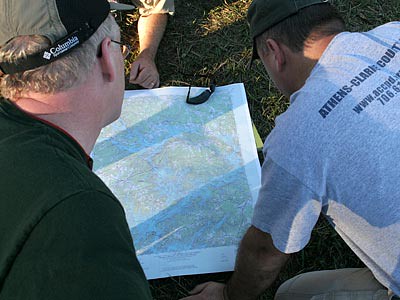
This shows the map, but there are no faces and the text on the back of the gray shirt is very distracting. Overall, I didn't like it as much.
I also took several shots from a ground-level angle. I literally laid on the ground on my side and shot with the camera a few inches off of the ground, and I like these more. You can see their faces clearly, there is no distracting wording, and with a caption you will know they are interacting with a map with their compasses.
When taking a shot, try to think of different angles and perspectives to capture the moment. Experiment with several ideas, even if you think it won't be comfortable or easy to do. Laying on the ground wasn't comfortable and surely wasn't easy to change my position when I needed to, but I think most would agree it resulted in a better shot. When you're all done, you can sit down and throw away the ones that didn't work.
One of the training classes we participated in was Orienteering. After receiving our instructions, we had a challenge to take a topography map and determine the exact location of the tent we were at.
With the map on the ground, we took our compasses and tried to determine exactly where we were. I took several photos of my patrol trying to figure it out. Some were from the typical standing position, looking over shoulders. Here is probably the best one:
This shows the map, but there are no faces and the text on the back of the gray shirt is very distracting. Overall, I didn't like it as much.
I also took several shots from a ground-level angle. I literally laid on the ground on my side and shot with the camera a few inches off of the ground, and I like these more. You can see their faces clearly, there is no distracting wording, and with a caption you will know they are interacting with a map with their compasses.
When taking a shot, try to think of different angles and perspectives to capture the moment. Experiment with several ideas, even if you think it won't be comfortable or easy to do. Laying on the ground wasn't comfortable and surely wasn't easy to change my position when I needed to, but I think most would agree it resulted in a better shot. When you're all done, you can sit down and throw away the ones that didn't work.
Subscribe to:
Posts (Atom)